If you’ve been looking to learn how to start a blog in 2024 to grow an audience and earn a living from the Internet, you’ve come to the right place.
With about four million blog posts published daily, you probably think that the industry is too saturated. However, the good thing is that there’s still room for everyone – and you can do it.
In today’s guide, we’ll walk you through the process on how to start a successful blog in 2024 step-by-step. That’s not all; we’re also going to show you some free tools and resources that’ll guarantee your success.
Simply follow the steps below to create your own blog and start enjoying the internet lifestyle.
If you’re still with me, let’s get started.
But first, why should you create a blog in 2024?
Table of Contents
- Why Create a Blog in 2024?
- How to Start a Blog in 2024
- Choose a Domain Name
- How Access the WordPress Admin Dashboard
- Choose a Theme For Your Blog
- Installing WordPress Plugins
- How to Install WordPress Plugins
- Configure Your Website’s SEO and Permalink Structure
- Create an XML Sitemap
- How to Submit a Sitemap to the Search Engines
- Install an SSL Certificate
- Create Your Website Pages
- Write Your First Post
- Create a Content Strategy
- Start Promoting Your Blog
- Make Money Blogging in 2024
- Frequently Asked Questions
- Conclusion
Why Create a Blog in 2024?
With video content dominating the web, plus the arrival of microblogging platforms such as Twitter and Instagram, you might be wondering if the whole idea of blogging is really getting out of fashion.
Well, this is actually not the case; blogging and content marketing is still growing and making lots of people money as always.
Don’t take my word for it, the numbers say it all:
- Thousands of new blogs are launched each day
- A study by Statista found that “the number of bloggers in the US alone will reach 31.7 million by 2020
- According to WordPress, “more than 409 million people read over 20 billion pages on WordPress monthly in 2020.”
- Statista also found that “over 47% of Internet users read blogs regularly”
- 70 million new blog posts and 77 million new comments are published every month on WordPress
- According to Convertkit, the average blogger income per year is $38,000
- Content marketing (including blogging) is now a $300 billion industry
Therefore, if you want to build an audience and make money online in 2024, the question shouldn’t be, “why should you create a blog in 2024?” — It should be, “why wouldn’t you?”
So as you can see, you have a bunch of reasons to create a blog in 2024 and beyond.
And in this guide, we’re going to show you how to do it, step by step:
How to Start a Blog in 2024
Now that you already know why you should create a blog, let’s now show you how to start a blog in 2024.
Choose the Right Blog Niche
What are the best blogging niches?
How do I choose blog topics?
What should my blog be about?
These are some of the questions we often get from our readers. This is the most critical part of creating a profitable blog, and this is the point where most newbies get stuck.
Apparently, every blog needs a niche – be it weight loss, cooking, marketing, hiking, underwater parkour solo dancing – whatever, there are a limitless amount of topics you can blog about out there.
Most pro bloggers will advise you to start a blog in a niche/topic you’re passionate about as it’ll help you survive the hard times when things get tough, and will also help you stay consistent with writing.
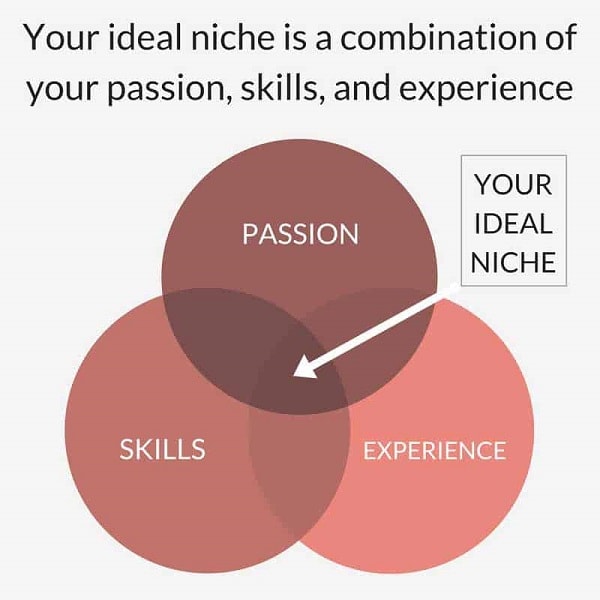
That’s not all; you’ll also hear something like “choose a niche that is connected to your passion, experience, and skills.
Unfortunately, while this model might seem perfect from a ley man’s point of view, it is still flawed because it’s missing one critical component of building a blog, which is “monetization.”
You need to understand one thing: When it comes to blogging, money always drives passion much more than passion drives money.
Now, assuming you go with this advice and choose your niche based on passion, experience, skills.
In this example, your passion is food/diet, your skills are helping people eat healthy to lead a healthier lifestyle, and your experience is that you’re a dietitians/nutritionist focused on providing medical nutrition therapy.
So you now decide to start a nutrition blog specifically designed to help people lead a healthier lifestyle.
- You build About Me page to tell your story, as well as all the other necessary pages
- Write a few blog posts (maybe 10 or 20)
- Incorporate dieting videos
- Create a YouTube channel and Instagram handle
- Add Amazon affiliate links to nutrition products
- And build an email list with a lead magnet – “How night eating can negatively affect your health.”
When a user subscribes to your email list, he’ll get a confirmation email followed by the gift you promised him. But the ultimate goal is to have him become a recurring customer.
Sounds very exciting, right?
However, I can assure you that this blog is bound to fail.
Did you just ask why?
Here’s the point: Monetization wasn’t your #1 priority when you choose this topic. Instead, you went for it based on passions, experience, and skills.
It’s absolutely going to take you years to monetize this niche, not because it’s not monetizable, but because it wasn’t part of the plans from the onset.
And remember, when a blog takes years to monetize, the chances of giving up becomes pretty much higher.
Now, here’s the big problem with blogging:
When starting, most people don’t know that the likelihood of failure is massive, so they spend a bunch of time building a blog that has no chance of success. In the end, they simply quit and start from scratch, reinvesting lots of time into building another blog that won’t succeed.
The reason?
Not because they are lazy, dumb, or cursed – but in most cases, it’s because they’re going after the wrong niches.
Undeniably, the rules are different if you’re creating a personal (hobby) blog. Once you enjoy the topic, and it is fun, you’re 100% set to go.
However, if you want to start a blog that will bring in consistent traffic and generate passive income, you must choose a profitable niche that has a chance of success.
It’s worth mentioning that all niches aren’t feasible. Some will fail regardless of how knowledgeable or experienced you are and how hard you work.
The good news, however, is that we will show you how to pick the best niche for your blog.
And it’s actually easier than you’d think.
How to Choose a Good Niche for Your Blog
The first step to choosing a niche is to make a decent list of topics that are of interest to you. They could be niches you think are very profitable, your hobbies, or just a random topic you read on social media while waiting to have a haircut.
Basically, if you can answer “yes” to the five questions below, then it’s probably a viable niche:
- Did you find other blogs in this niche ranking well on the search engines?
- Enough competition for this niche in Google?
- Did you find books on Amazon with a good number of reviews on this niche?
- Do any blogs on this niche have reasonable followers on social media (Twitter, Facebook, and Pinterest)?
- When you carry out a search for keywords related to the niche, are there any Google ads?
- Are you able to find words, phrases, and related phrases on this niche with a good number of monthly searches in Google?
These questions will typically tell you whether or not there’s an existing audience for the niche.
This is very important because lots of bloggers try to be different in the wrong way. They chase an audience no one else is serving. They assume that “if this niche has no competition, it’ll be super easy to create a successful blog around it!”
But this is very wrong!
Essentially, if the niche has zero competitors, where will your readers/audience come from? Who will link to your blog? How will people find you?
Ideally, the more competition there is in a niche, the more profitable that niche is, and the easier it is for a newbie to find success in that industry.
So, don’t try to reinvent the wheel or be unique.
Choose a niche that already has an audience and has popular blogs fighting for the audience’s attention. This way, you’re actually starting your blog like a business from the foundation.
Now, we’re going to pick your niche based on the real key factors:
- Audience discovery and potential
- Professional leverage
- Keyword research
Now, let’s treat the factors one after the other.
1. Discover your audience
When you’re creating a new blog, your first focus should be to figure out who your audience is and what pain point you’re trying to solve.
To actually make money from your blog, you need to solve a problem that your audience will be willing to spend money on.
This is why it’s crucial to have a profound understanding of their pain points so that you can offer them the perfect solution, and they’ll happily pay you for it.
And the best way to do this is to look at yourself.
You want to find out the audiences you’re a part of. This is you’re more likely to understand a specific group’s pains if you’ve been there yourself.
For example, when I started the Bloggers Passion blog, I was a young Indian working in the tech industry. I was working late hours, not having time for my friends and family, and always getting stressed and burned out.
This pushed me into creating the blog as a means to escape the rat race – a way to make passive income and take back full control of my life.
Therefore, my target audience was individuals that are having this same challenges:
- 25 to 45 years olds
- Technically savvy and smart
- Has a stressful job and want to escape the rat race
- Willing to put in the work required to create passive income online
Once you’ve figured out who your target audience is, the next step is to understand how much they will be able to spend to solve their problems – this is the revenue potential of your audience.
Source: successunscrambled.com
But rest assured, everyone will be willing to spend any amount of money to solve his problem. Regardless of the price, if you have a practical and proven solution to your audience’s pain points, they’ll undoubtedly be happy to pay the price to end their misery.
2. Professional Leverage
Once you’ve figured out your target audience, the next thing is to discover the advantages you may have over the competition.
For example, you can start by asking yourself the following questions:
- What connections do I have in the industry?
- What experience do I have?
- Can this experience be leveraged into a successful blog?
- Which websites in the industry will easily accept me for a guest post?
Obviously, the first step to building a successful blog is to build influence. And to achieve this, you need to go out of your comfort zone and utilize your professional experience, your connections, and everything within your reach as if your life depends on it.
To grow your blog, you’ll need to carry out lots of outreach to build new connections. Things like building solid relationships within your niche will enable you to guest post on authoritative blogs to get relevant, high-quality backlinks.
You may not have lots of connections or published articles out there when you’re just starting, which might make you question “why anyone would want to feature you” on their blog. Now, this is precisely where utilizing your professional background comes in.
For instance, if you’re a plumber, you may already have some clients and contacts from local meet-up groups, and even know a few influencers in the plumbing niche that you met in the past.
Leveraging these contacts later in the future will undoubtedly help accelerate your blog growth. You want to use every advantage you have in your arsenal.
3. Keyword Research
Let me make it clear now, “keyword research” is the most critical step when deciding on a niche for your blog.
It’s pretty simple: Are people carrying out searches in the search engines for the things you want to write about?
If you answered “YES” to this question, then the first challenge is already conquered.
According to SEO Tribunal, “people carry out searches on Google 63,000 times each second. Do the math, that’s a whopping 3.8 million searches every minute – 228 million searches every hour – and about 5.6 billion searches every single day.”
As you can see, to leverage search engine traffic, you need to become good in keyword research so you can always find those easy-to-rank keywords and beat the competition.
Excitingly, there are many useful tools out there that can help you understand all of this search data. With helpful tools such as Ahrefs and SEMRush, you can always check individual keyword metrics, including things like:
- Monthly search volume: This shows the number of times a specific keyword is searched for in a month
- Keyword difficulty: This is an indication of how difficult is it to rank for a specific keyword based on the competition (usually calculated on a scale of 0 to 100)
- Average cost per click (CPC): This metric shows how much the keyword is worth assuming you want to create a PPC ad for it. It’s a good pointer of the keyword’s worth/value
So what should you be looking for in this case?
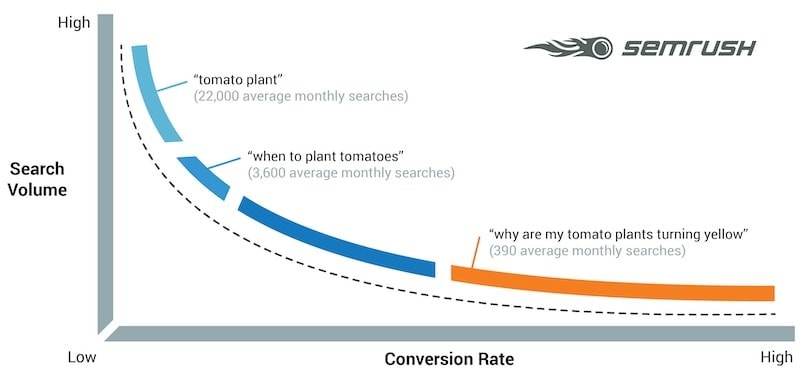
The idea is to find long-tail keywords with low competition. In the beginning, the monthly search does not matter much. The focus should be to find keywords you can easily rank for in the search engine result pages (SERPs).
Even if the keyword gets 10 searches per month but the competition is pretty low, I’ll go for it.
Here’s how I rate my keywords based on the competitive metrics.
Keyword Difficulty:
- 0 to 20: Low
- 21 to 50: Medium
- 51 to 70: High
- Over 70: Very High
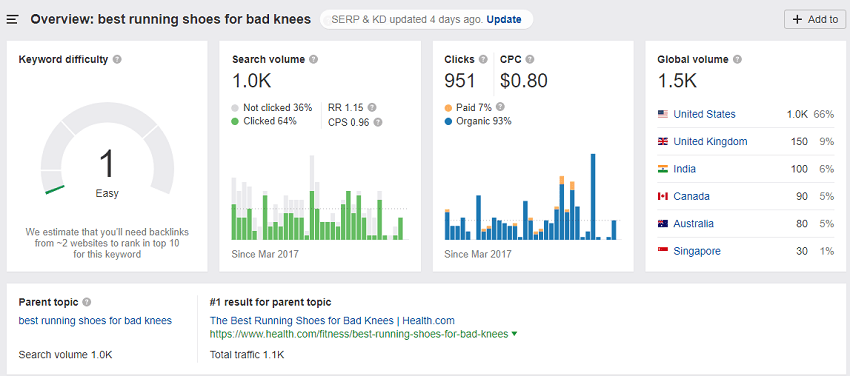
For example, assuming you just created a new blog in the “running niche,” and you’re looking to write an article about running shoes.
Your first instinct will be to target the keyword “best running shoes,” which gets a whopping 41,000 monthly searches according to Ahrefs “keyword explorer.” As you can see, the keyword is sweet, and if you’re able to rank for it, you’ll get an avalanche of traffic and sales.
But unfortunately, when you look at the keyword difficulty (KD) of that keyword on Ahrefs, you’ll see that it’s a no go area for a new website like yours:
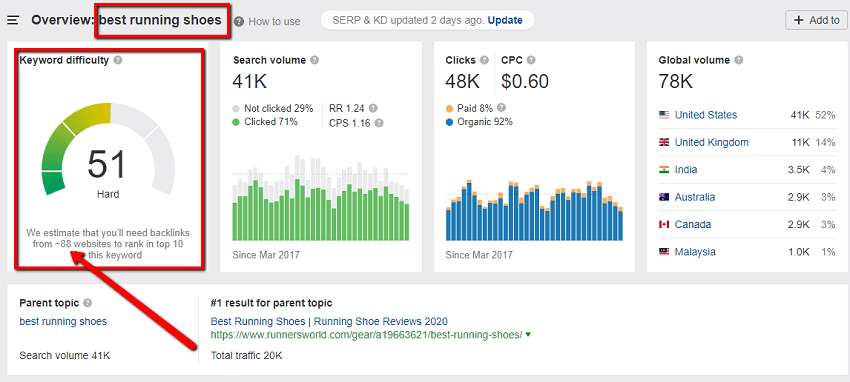
From the screenshot, you can see that the KD is 51, which is something you cannot rank for right now, except you’re able to get over 80 websites to link for you. I don’t know how you want to achieve that as a newbie blogger.
However, all hope is not lost.
As someone who’s already experienced in keyword research, instead of going for the tough keyword “best running shoes,” I’ll search for other longer tail related keywords that have low competition. That way, I won’t have to sweat my blood out to rank for the keyword.
For this example, I was able to come up with the following keywords:
Keyword 1: what are the best running shoes for flat feet
- Search volume: 150
- Keyword difficulty: 14
Keyword 2: best running shoes for bad knees
- Search volume: 1000
- Keyword difficulty: 1
Keyword 3: best running shoes for heavy men
- Search volume: 1100
- Keyword difficulty: 10
Keyword 4: running shoes for high arches
- Search volume: 1100
- Keyword difficulty: 9
While the keyword “best running shoes” gets a lot more searches per month, there are hundreds of potential variations of this keyword that will make life easier for you.
You may be tempted to go for the higher searched keywords, but you’ll end up being frustrated as you can’t move the needle in the SERPs due to the crazy competition. This is why it’s always advisable to start targeting those low hanging fruits at first until your blog has matured enough to fight for tougher keywords.
And with Ahrefs, you can also click on the “phrase match” and filter by “keyword difficulty” to uncover even more easier to rank keywords:

With the right tools such as SEMrush, Ahrefs, and Google Keyword Planner, picking great keywords for your niche will be very easy.
Now that you’ve picked your niche, uncovered a profitable audience, performed keyword research, and planned on how to leverage your connections, it’s time to get to the main work of creating your blog.
Choose a Blogging Platform
We’ll keep this section as brief as possible.
Basically, there are lots of free blogging platforms available on the internet – and they all offer solid value for what they do.
In fact, it wouldn’t be a bad idea to start with a free Medium.com account, which will let you test your ideas and ensure that you’re viable before building a full blog.
But the moment you’re all set to build your own audience and generate some income for yourself, there’s just one blogging platform you should look at:
WordPress!
Not the free WordPress.Com though, I’m specifically talking about the self-hosted WordPress (WordPress.org).
In case you don’t know already, WordPress.com and a self-hosted WordPress blog are totally different platforms.
The former lets you start your blog on their platform free of charge, but as expected, you’re limited to what you can do on your blog. And yes, they own your blog and can decide to pull the curtain on you anytime, and you can’t call the police.
While the latter is a self-hosted blogging platform, which is actually free in actual sense, but you must get your own domain and hosting to use it. And as you can guess, you have limitless opportunities here as the blog is 100% yours.
A study by W3techs found that “WordPress has about 61.8% of the CMS market share, more than all other systems combined (Drupal, Joomla, etc.).
And as of the time of writing this, 34.6% of the websites on the internet are powered by WordPress. This includes big brands like the Star Wars blog, TechCrunch, Mercedes-Benz, etc.
With unlimited customizations and designs you can implement, and plugins you can install, a self-hosted WordPress blog offers more flexibility than the free platforms can beat.
And as I mentioned earlier, WordPress.org isn’t entirely free once you add up the other costs.
Being self-hosted means that you have to buy a hosting package so you will be able to install WordPress on your host. You’ll equally be required to buy your own domain name. These things will obviously cost you some money.
However, there are relatively minor expenses that should not even deter you as they’re not even up to the cost of a solid meal if you think of it.
And if you’re truly serious about blogging in 2024 building your own audience, and monetizing your content to earn a living from it, you need to create your blog on a solid foundation.
To put succinctly, you need WordPress.
Choose a Domain Name
I spent lots of time on this step when I started. I combed different domain name registrars for weeks looking for the perfect catchy, short, memorable, and niche-specific domain name.
Yes, we all know that this is an important step, but it’s probably not as important I made it back then.
In the past, you can just get exact-match keyword domain names such as runningshoes.com or steammops.com to help you rank on Google easily. But it’s harder nowadays.
Some of the experts out there will usually advise you to “niche down” and opt for an ultra-specific domain name; however, I highly suggest you go for a name that’s broad enough to let you expand if necessary.
This is because if your focus is too narrow and you suddenly lose interest in the niche or run out of content ideas, you’re trapped with the domain and can’t go further.
However, if you go a little broader with your domain, you can easily pivot your content and have enough ideas and flexibility to maintain consistency, avoid giving up and keep running your site for a very long time.
Therefore, when choosing a domain name, you want to opt for a broader name and worry about getting specific in your posts and pages.
That said, here are some other factors to consider when choosing a name for your new site.
1. Domain Registration Price
Domain registration will usually cost you about $10 per year from Namecheap or GoDaddy. However, if you get hosting from Bluehost (which I recommend), you will enjoy a free domain name for your first year.
2. Use a Simple Name
You don’t want to use a name that is too difficult and complex to type. Instead, use one that is very easy to memorize and type.
Aside from that, you also don’t want to use something that’ll confuse people due to difficult spellings. For example, do not use hyphens and numbers in your domain, as it’ll often confuse your audience.
3. Domain Extensions
There are different domain name extensions on the web – .com, .net, .us, .guru, .org, .sport, etc.
All the extensions have different meanings and representations; however, .com is the top-level domain that is widely used on the Internet. This is because it’s easier to remember, and people believe that it’s mostly favored by the search engines.
According to Growth Badger, here’s how web users rate some of the top-level domains when it comes to trustworthiness, on a scale of 1 to 5:

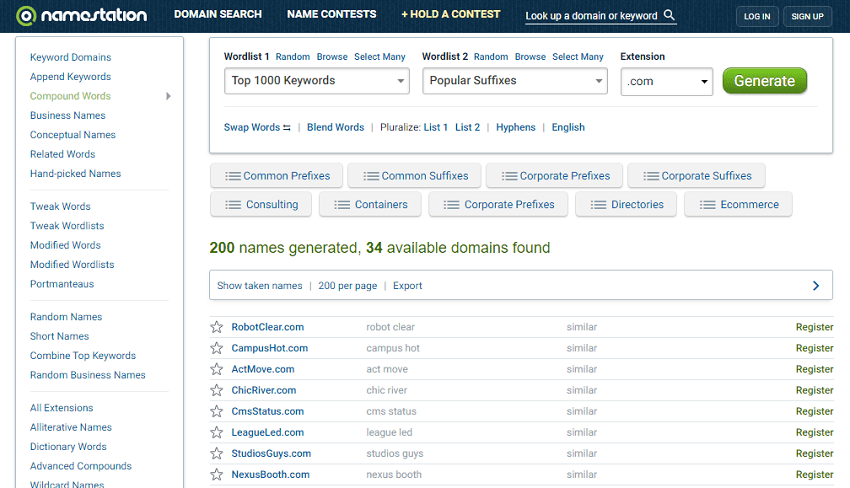
If you get confused and can’t seem to find a good name, simply use a domain name generator tool such as NameStation to generate a bunch of ideas.
And once you’ve found what you’re happy with, proceed to Namecheap.com to register is at once if you don’t want to register it with your host.
Choose a Web Hosting Company
You need a web hosting account to store your website files so that your visitors can access it on the web. Generally, your site cannot be visible on the internet without a hosting account.
Furthermore, the performance of your new website will significantly rely on your hosting provider. A good hosting solution will ensure that your blog is available on the web 24×7 without any interruption.
It’s also important to choose a web hosting solution that is popular, reliable, secure, and is pocket-friendly. During the early stage of your website, you don’t need to invest in any of the bells and whistles that usually come with some hosting companies.
At this point, you should focus more on beginner hosting plan that will still give you rest of mind and still have room for scalability when your blog outgrows the starter plan.
And from experience, Bluehost is a perfect option for in terms of all the factors mentioned above.
With Bluehost hosting, you’ll enjoy:
- Free domain name for the first year
- Low introductory pricing
- High-speed servers
- Free SSL certificate
- Excellent security measures
- 99% Uptime
- Easy cPanel dashboard
- 24×7 customer support
- Beginner-friendly dashboard
- Lots of hosting options to choose from
- 1-click WordPress Installation
- 30-days money-back guarantee
- Highly recommended by WordPress itself
Now that you already know why you should use Bluehost for your hosting, let’s quickly proceed to register your domain name and your web hosting with Bluehost:
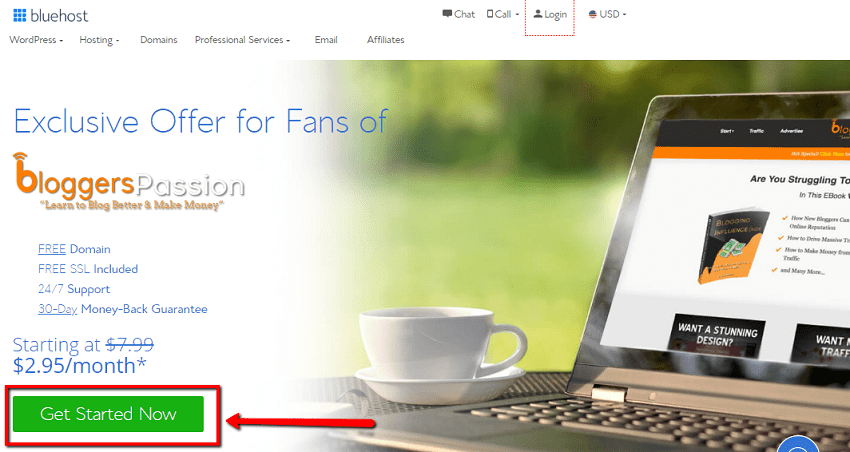
Step 1: Visit Bluehost.com and click on the blog “Get Started” button on the homepage as you can see below:
Step 2: Choose your preferred hosting plan
Once you click on the “Get Started” button, you will be taken to Bluehost shared hosting plans, which includes:
- Basic plan
- Plus plan
- Choice Plus plan
You can go with any of these shared hosting plans for your new blog, but I would recommend you choose the Basic plan for now.
As you can see from the screenshot below, the “Basic Plan” comes with 1 website install, 50GB disc space, unmetered bandwidth, free SSL certificate, 1 free domain, and lots more.

The basic plan has every feature your new blog will need to grow for now. And the good thing is that with Bluehost, you can always upgrade to a higher plan once you outgrow your existing plan.
There’s also a “Pro Plan” which comes with even more advanced features:

But like I said, we’re settling for the “Basic Plan” for now.
Step 3: Enter your domain name
Hopefully, you have already decided on a domain name by now. And you’ve also selected a hosting plan from Bluehost. The next page is where you will need to enter your domain name.

Now, go ahead and enter your domain in the “create a new domain” section, or enter it in the “use a domain you own” section if you’ve already registered your domain somewhere else like Namecheap.
But I’d suggest you use Bluehost to register your domain so you can leverage the free one-year domain registration.
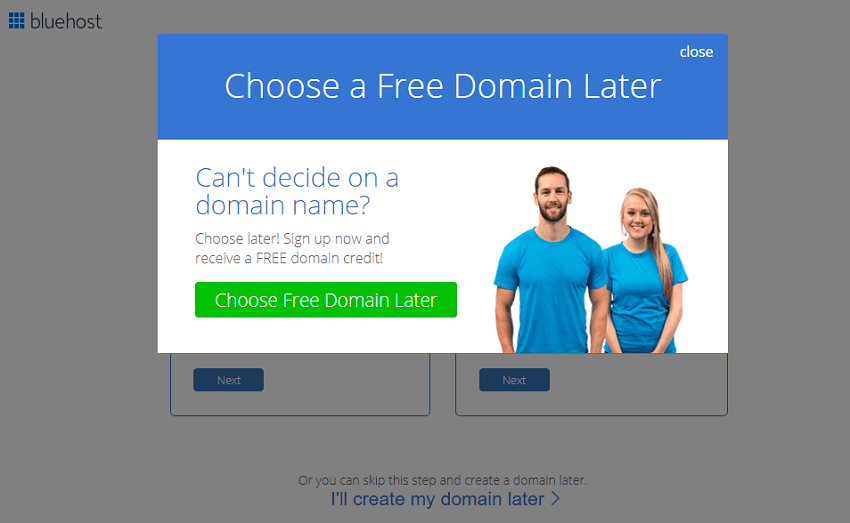
However, if you are still unsure of the name to use, then simply click on the “I’ll create my domain later” link to go to the next section.
But I hope you’ve chosen your domain, so just enter it and click on the “Next” button to go to the next step.
The next step is to create your account, which is actually the final step of the web hosting registration process.
Step 4: Enter your account details
Now, you’ll be requested to fill in your account information in the spaces provided:
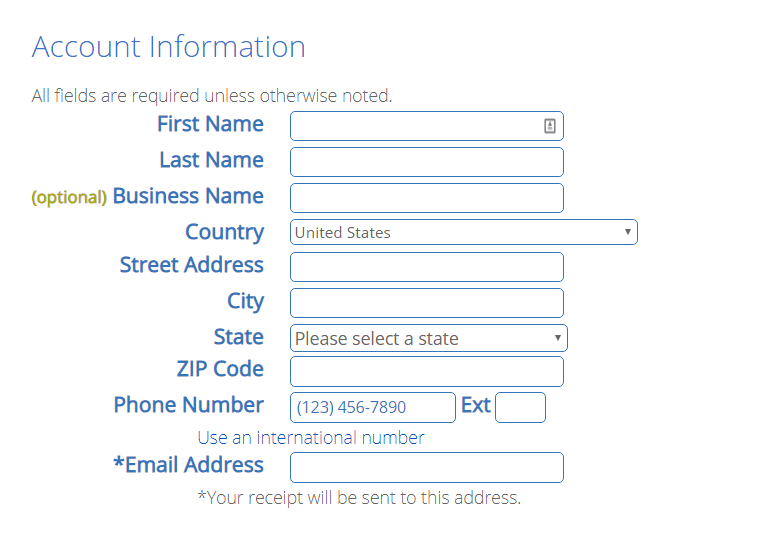
It’s important you enter the correct details, such as your first, last name, phone number, business name (if applicable), country, address, etc.
When you’ve entered all the required details, scroll down to the “Package Information” section. This is where you’ll have to choose how many years of hosting plan you’re paying for.

Essentially, you can pay for 12, 24, 36, or 60 months of hosting upfront. You’ll also enjoy attractive pricing discounts for a more extended upfront payment.
If you will be running your blog for years, I’d advise you to choose the “36 Month” hosting duration so you can get the lowest possible price at $2.95 per month (if you sign up with my link).
Looking at the above screenshot, you also have another section, which is called “Package Extras.”
Here, you can unselect the extras you don’t want to use, such as SiteLock Security and Codeguard Basic, as you won’t be needing them.
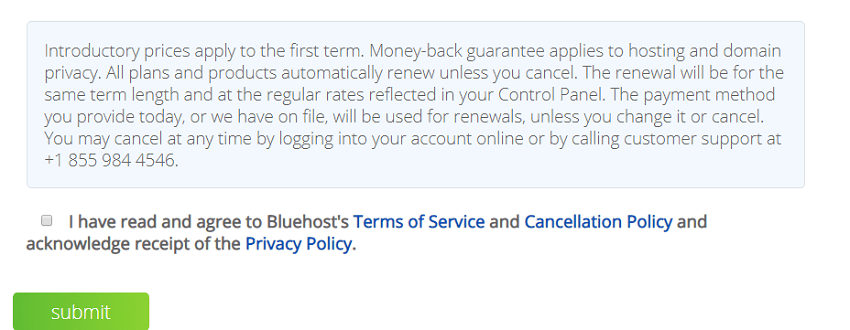
Once that is done, the next step is to choose a payment option:
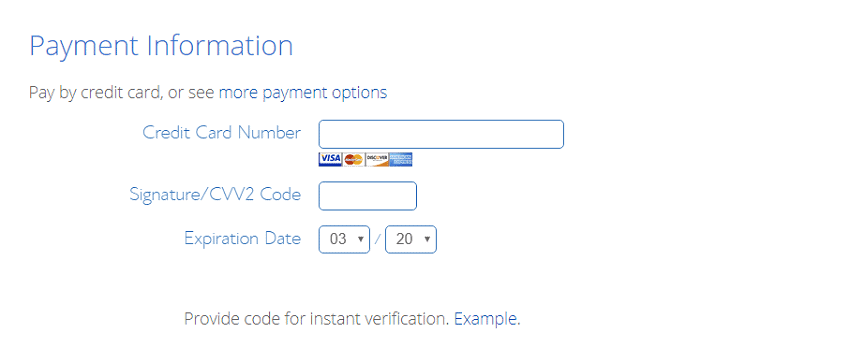
Once you’ve entered your payment information, accept their terms of service and cancellation policy below, and click on the “Submit” button to complete your registration:
Congratulations – you’ve successfully created your hosting account.
Step 5: Set up your account and create a password
Now, the next step is to enter your domain name and set up a password for your new Bluehost account. Your WordPress admin password will come later through email.

Step 6: Log in to your Bluehost account
Now, with the password you just created, log in to your Bluehost account:

Install WordPress Using Bluehost One-Click Installation
Interestingly, Bluehost will help you to install WordPress automatically on your server without any effort on your part.
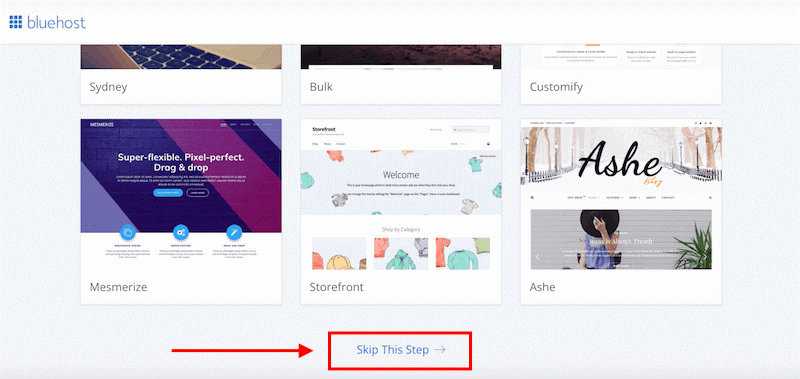
Once you’ve successfully created your Bluehost account password and logged into your account, you will be required to choose a theme for your blog.
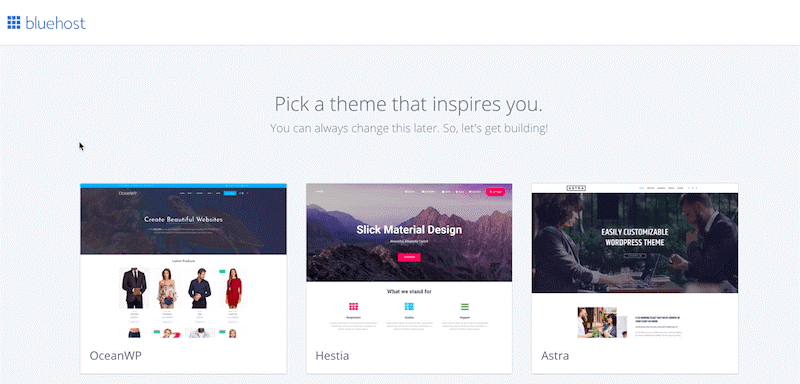
Here, you will get a bunch of stunning free WordPress themes to pick from.
However, I’d suggest you skip the theme installation process for now by simply clicking on the “Skip This Step” link beneath the page.
You’ll now be taken to a new page, where you need to click on the “Start Building” button to proceed.

Next, choose the type of website you want to build:

Finally, enter the title and description of your site:

After that, you will be taken to a page where you will choose your blog’s layout.
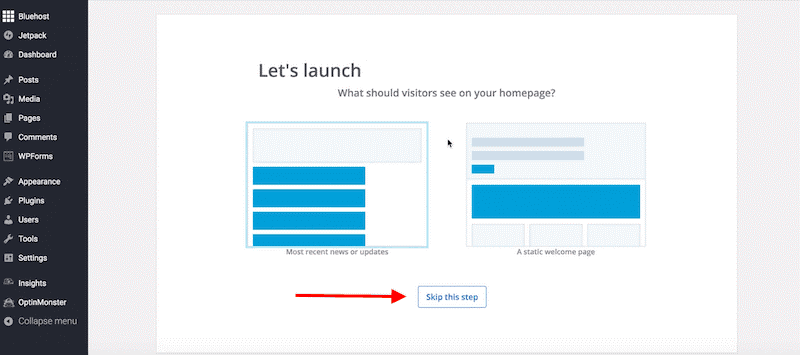
This process helps you to prepare the base of your blog. However, if you’re using another web host apart from Bluehost, you’ll not go through this process after signing up for the host. You will just need to login to your cPanel and install WordPress from there.
Now, let’s proceed to the next step.
How Access the WordPress Admin Dashboard
In your web browser, enter your WordPress login URL by adding /wp-admin to the end of your domain name.
It should be something like https://yourdomain.com/wp-admin.
From that URL, you’ll be directed to your WordPress login page, as shown below:
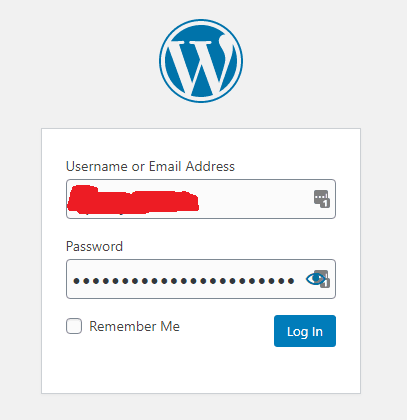
Now, enter the username and password that was sent to you by Bluehost, and click on the “Log In” button.
Your admin WordPress dashboard will look like this:
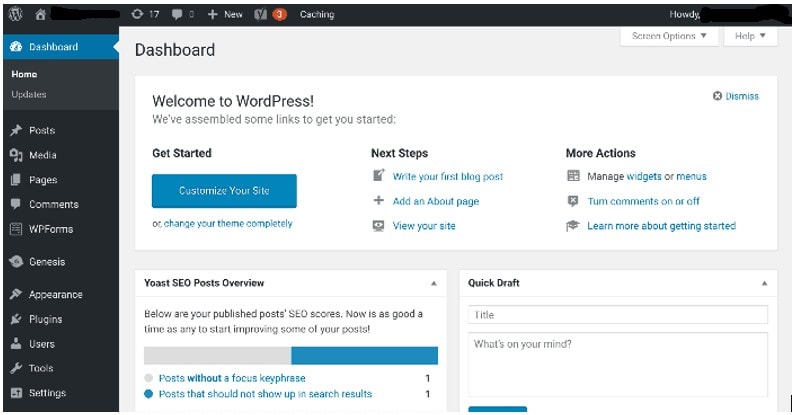
Now, this is the fun part of the process – customizing your WordPress blog.
Let’s first start by giving it a new look, which we skipped earlier.
Choose a Theme For Your Blog
Now that your blog is up and running, you need to choose a good WordPress theme for it to give it your desired look and design.
Here’s what your blog will look like at the moment:
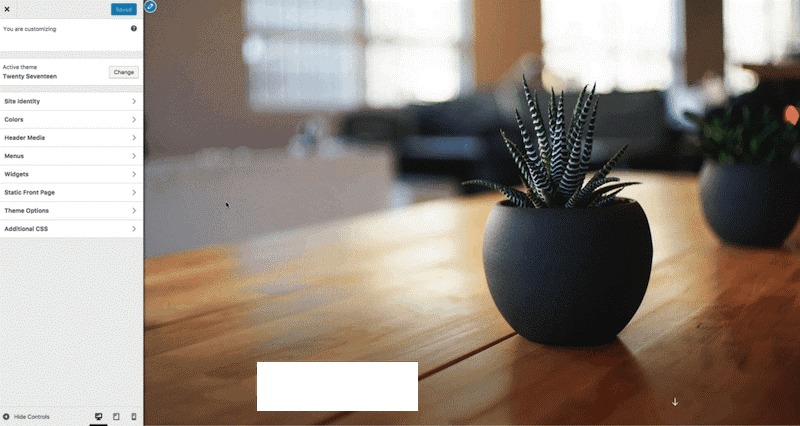
This is the default theme that comes with every new WordPress installation, and on the left-hand side, you will see the menu from where you can customize the theme.
While it is not the most beautiful WordPress theme on the internet, it is still useable – but we can do a lot better.
Giving your blog an enchanting look without having any coding skill is pivotal for every new blogger. Besides, it is important to create a design that is both practical and eye-catching.
Websites that are designed to make it easier for users to navigate and find information tend to get the most traction. While blogs that are designed with an awkward and poorly organized layout create confusion for users.
Interestingly WordPress comes with several free and paid themes you can select from. It might also interest you to know that WordPress currently has over 3,000 free themes for its users.
Therefore, as a new blogger who probably does not have a big purse, you don’t have to spend more money on a paid theme as you can just get something decent for free.
Now, let me show you how to install a theme on your blog:
Hopefully, you’re already logged into your WordPress admin following the steps you discussed earlier.
The whole process might seem somewhat difficult at first, but you will eventually get used to it. Just have it in mind that you will be spending lots of time here.
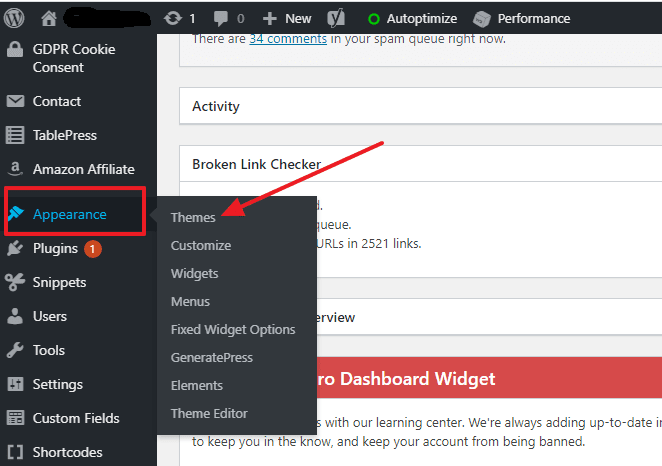
Now, click on “Appearance” from the sidebar menu and select the “Themes” option:
Click the “Add New” button located at the top of the page to search for the themes.

As you can see from the screenshot below, you now have access to a bunch of beautiful themes that are totally free of cost.
You can also click on the “upload theme” button to upload a theme that’s already on your computer.
Now, scroll down the page and preview the themes that caught your eyes before choosing one for your blog.
You’re also allowed to filter the themes based on “Subject,” “Features,” and “Layout.”
The screenshot below is what the filter option looks like:
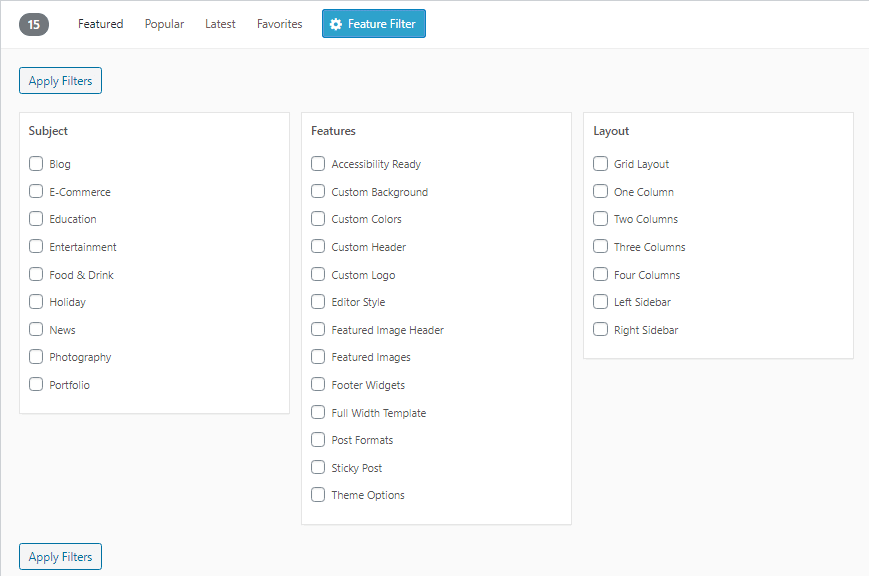
The filters will allow you to narrow down your search according to your preference.
Clicking on the thumbnails will give you a preview of what your blog is going to look like. And once you see a theme you like, simply click on the “Install” button to install it.
Furthermore, if you bought a premium theme from another provider, it’ll be sent to you in a zip format. To install it, click on the “Add New” button, upload the zip file, and click the install button.
Bravo! You now have a full-fledged WordPress blog with a new theme.
But before you install any theme, endeavor to preview its demo to know how it looks in real-time.
The best thing about all this is that you can change your theme whenever you want without messing up your content.
For instance, if you choose to use a free WordPress theme, you can decide to switch to a premium theme later on when you have the money.
That said, below are some of my recommended premium theme providers for WordPress:
- Themeforest
- GeneratePress
- Thrive Themes
- StudioPress
- Astra
- Elegant Themes
- CSS Igniter
It doesn’t really matter what theme you choose in the beginning long as it looks good, loads very fast, and allows you to publish content. So there’s certainly no need to worry about the perfect design right now. Just get started now and worry about that later.
However, premium themes usually cost from $30 to $500, so you might as well go for it if you can afford it at the moment.
Installing WordPress Plugins
The good thing about WordPress is that you can customize it in a limitless amount of ways due to its open-source nature. And it all begins with WordPress plugins.
Simply put: Plugins are a little set of softwares that you can use to improve your WordPress website’s functionality in any way you want.
You can typically install as many plugins as you want to add extra features to your blog without having a single coding knowledge.
Furthermore, WordPress has thousands of plugins in its plugin repository with various functionalities. Just think of any feature you want on your site, and you’ll find a suitable plugin for it. Be it for email marketing, improving your website’s SEO, or creating a full-fledged eCommerce website.
However, it is never advisable to install a bunch of plugins on your blog. This is because too many plugins will affect your website loading speed negatively. And aside from that, they can also create conflict with each other.
That said, below are a few of the best WordPress plugins that will help you improve your new blog:
- Classic Editor
- Elementor Pro
- Easy Table Of Contents
- Gdpr Cookie Consent
- Shortcodes Ultimate
- Optinmonster
- Shortpixel Image Optimizer
- Wp Last Modified Info
- WP Rocket
- Yoast Seo
- Contact form 7
- Broken link checker
- W3 Total Cache
How to Install WordPress Plugins
Now that we’ve gone through what plugins are and some of the ones you need, let’s now talk about how to install them on your blog easily.
Inside your WordPress admin dashboard, in the left-hand navigation pane, point your cursor on “Plugins” and click on “Add New.”
You have two options you can choose: Click on the “Upload Plugin” option (if you downloaded a 3rd-party plugin such as WP Rocket), or simply enter the name of the plugin you want to install in the “Search Plugins” field (if you’re looking for a free plugin):

Now, let’s go through both options:
Options 1: Installing a 3rd-Party Plugin
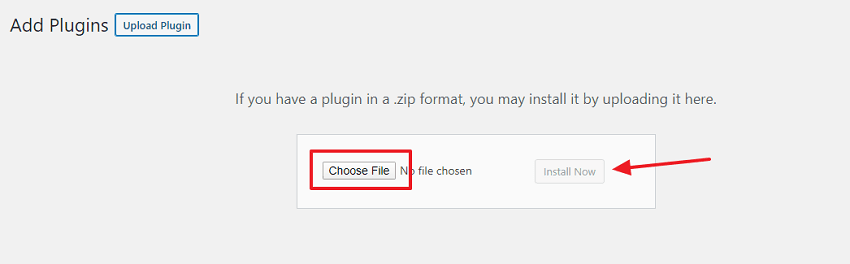
If you’re installing a 3rd-party WordPress plugin you downloaded elsewhere, just click on the “Upload Plugin” button, then click on the “Choose File” button.
Once that is done, the next thing is to locate the 3rd-party plugin on your computer (Example: wp-rocket.zip), select it, and click the “Install Now” button to install it on your site:
Option 2: Install a Plugin from the WordPress Plugin Repository
If you want to install a plugin directly from WordPress plugin repository, just enter the name of the plugin (Example: “Yoast SEO”) in the Search plugins areas and click on the “Install” button as shown below:
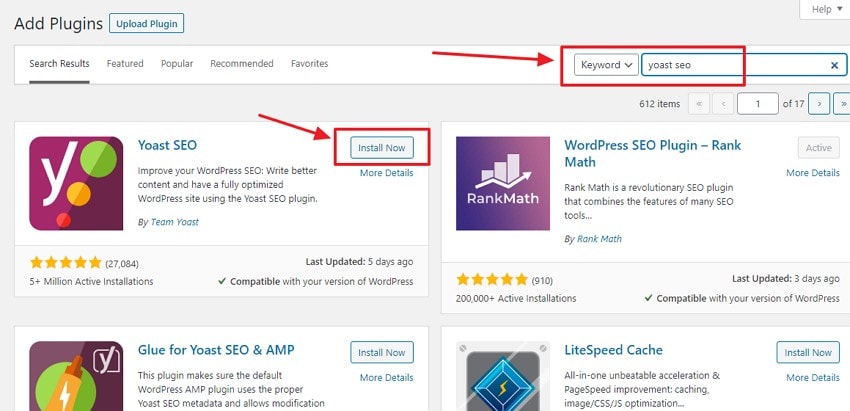
See how simple it is?
But we’re not done yet.
We still need to activate the plugin before it becomes functional on your blog, and that’s what the next step is all about.
Activating a WordPress Plugin
Regardless of if you installed a premium plugin from a 3rd-party website or a free plugin from WordPress, you’ll activate it the same way.
This can be done by simply clicking on the “Activate” button that appears once you install the plugin:

Or by going to “plugins” in the left-hand navigation pane and clicking on “installed plugins.”
Once that is done, you’ll want to find the plugin and click “Activate,” and that’s all.

The next step now is to configure your website’s SEO and permalink structure:
Configure Your Website’s SEO and Permalink Structure
Check out the link shown on the screenshot below:
That is exactly what a permalink looks like.
But what are permalinks?
To put succinctly, they are static hyperlinks that will take your users to a specific page on your website.
By default, your permalink will look like “yourdomain.com/postID.”
As you can see, apart from this looking very unattractive and untidy, it is also appalling from the SEO point of view.
Therefore, before you start writing blog posts for your site, you want to ensure that you set a specific permalink structure first.
To do this, go to “Setting” => “Permalinks” from your WordPress admin dashboard:
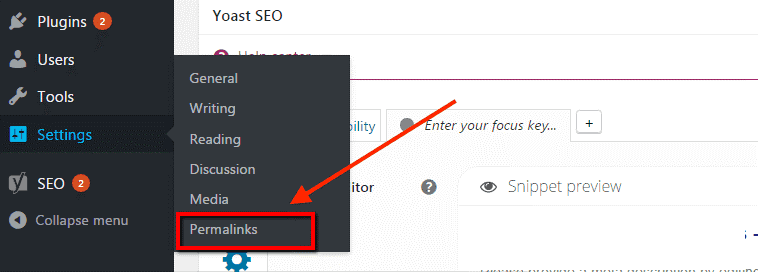
You have different options to choose from. However, most popular blogs out there follow the “Post name” structure, as shown below:
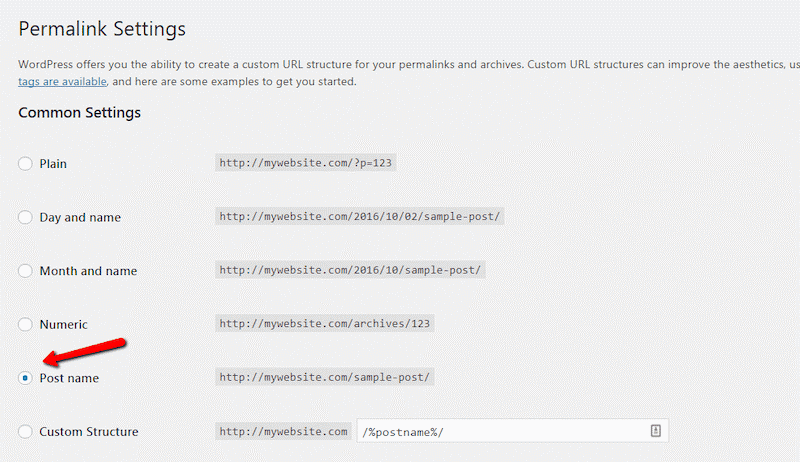
Before closing the page, make sure you save the changes. Once that is done, we can move to the next stage, which is to ensure your blog can be found by Google:
Make Sure the Search Engines Can Find Your Blog
To make sure that the search engines can find your website, you need to ensure that the following is unchecked:
Go to “settings” and click on the “reading” button in the left-hand navigation pane of your WordPress admin dashboard.
Confirm that the “Discourage search engines from indexing this site” radio button is not checked as shown below:

Create an XML Sitemap
A sitemap is simply a file where you give the search engines details of the posts, pages, videos, and other related files on your blog, as well as the relationships between all of them. The search engines such as Google read this file to crawl your website more intelligently.
Basically, when your website is new and has little external backlinks pointing to it, the sitemap will help to make sure that the search engines are able to discover your content.
With that out of the way, here’s how to create a sitemap for your new blog:
How to Create an XML Sitemap
I believe by now; you’ve already installed and activated the Yoast SEO plugin we recommended above. If that’s correct, then creating your sitemap will be super easy.
In the left navigation of your WordPress admin dashboard, hover your mouse over “SEO” and click the “General” button.
From there, select “Features” and scroll down to the “XML sitemaps” section and toggle the switch ON.

Congratulations!
Your website now has an XML sitemap. The next step is to submit it to the search engines (Google, Bing, etc.).
Now, before leaving the Yoast SEO plugin dashboard, copy your sitemap’s URL:
To achieve this, click on the question mark icon you’ll see next to XML sitemaps and then click on the “See the XML sitemap” link to view it:
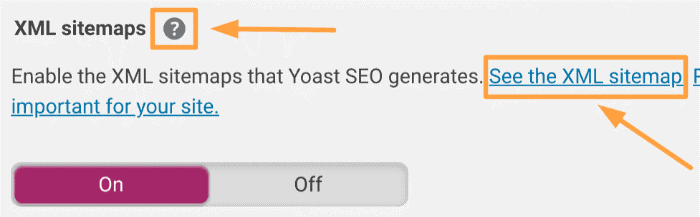
Clicking on that will open your sitemap in a new browser tab. Now, copy and save the URL in the address bar.
NOTE: RankMath is another popular SEO plugin that has become incredibly popular in the industry, and I’ve started using it on my sites. If that’s the SEO plugin you want to use, click here to learn how to set it up.
How to Submit a Sitemap to the Search Engines
The steps to submit a sitemap is different for each search engine. But we’ll just go over the most popular ones:
Submit your Sitemap to Google Search Console
Visit Google Search Console and log in with your Google account and select your site in the left-hand pane.
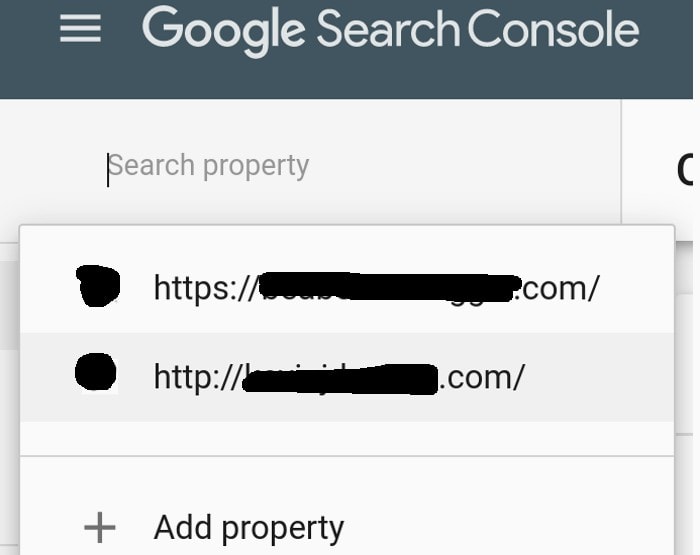
If you’ve not added your blog to Google Search Console yet, click on the “Add property” button and follow the steps you’ll see.
Under the “Index,” click on the “Sitemaps” option, and in the “Add a new sitemap” area, copy and paste the URL you got earlier and click on the “Submit” button.

Submit your Sitemap to Bing Webmaster Tools
Sign in to the Bing Webmaster Tools if you already have an account or create an account if you don’t have one already.
Once you’ve logged in, click on “your website” under the “my sites” section. If you’ve not added your site to Bing Webmaster Tools yet, then put in the URL of your site in the “add a site” area and click on the “ADD” button.
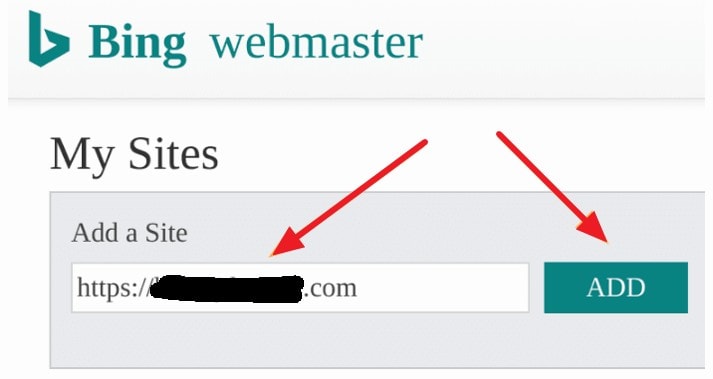
Now, click on the “Configure My Site” option and “choose Sitemaps” in the left-hand pane, and enter your sitemap’s URL (the one you saved earlier) in the “Submit a sitemap” section and then hit the “Submit” button.

And that’s all.
You’ve now submitted your blog’s sitemap to Bing and Google.
Congratulations!
Install an SSL Certificate
SSL certificate is what will change your web address from HTTP to HTTPS, and it’s very important.
Here’s why:
Once an SSL certificate is installed on your site, your visitors will know your blog is safe as their personal info, and sensitive data are encrypted.
Aside from that, Google also sees SSL as a ranking signal. This means that not having an SSL certificate installed will affect your rankings in the SERPs negatively.
That said, how do you know if a site has an SSL certificate or not?
It’s simple: You’ll see a secure padlock and https in the website’s URL as shown below:

If you see those in a URL, it means that the website is secure – and vice versa.
How to Install an SSL Certificate to your Site
Fortunately, your web hosting plan from Bluehost comes with free SSL certificates from Let’s Encrypt, and below is how to install it:
- Login to your Bluehost account cPanel
- Click on the “My Sites” tab located on the left side navigation menu
- Find the website you want to activate an SSL certificate for and click on “Manage button”
- Open the Security tab
- And under “Security Certificate,” turn ON the Free SSL
Once SSL is turned on, it can take some hours for it to be fully installed and activated. In some cases, we may be required to take some actions to finish the process. If that’s the case, you’ll get an email from Bluehost with clear instructions.
Create Your Website Pages
This step is somewhat straightforward. There are a few pages you’ll need to create on your website that will form the backbone of your site.
It all depends on what you want, but some of the most important pages you must create include:
- About Page
- Earnings Disclaimer
- Privacy Policy
Every other page that will be on your site depends on what you want.
That said, creating a page on WordPress is very easy. Simply navigate to “pages” in the left-hand pane of your WordPress admin dashboard and click on “add new.”
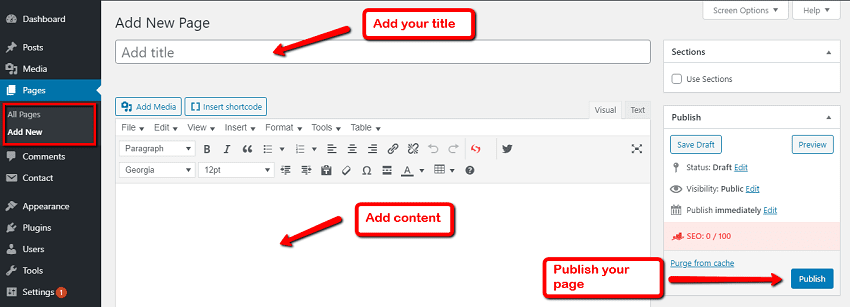
The next page is where you can now add your page title and content. And once that is done, hit the publish button to make it live.
And that’s it!
Write Your First Post
Publishing your first blog post is actually the most exciting part of the process.
Luckily, WordPress uses a very intuitive editor that is similar to the other word processing tools you’re already used to.
Now, let’s see how you do it.
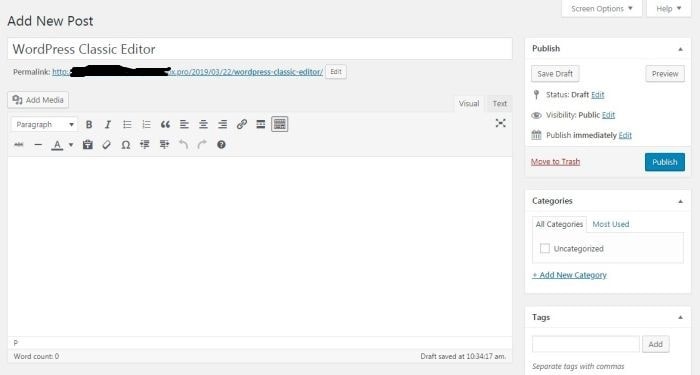
How to Create a Blog Post in WordPress
Navigate to “posts” on the left-hand side of your admin dashboard and click on “Add New.”
If you’re using the old (regular) WordPress content editor (classic editor,” your screen will look like this:
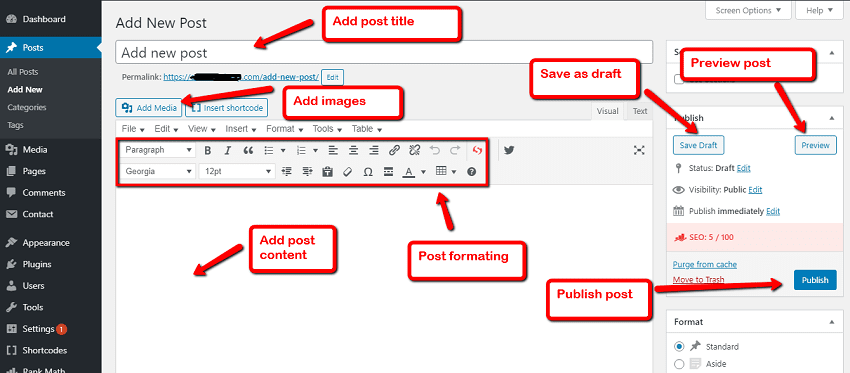
And if you’re using the new block editor (Gutenberg editor), you will see this:
Whichever way, you’ll be able to add your post title, write your post, add images to your post, assign your post to a category, etc.

Here’s a detailed instruction from WordPress on how to navigate the class editor.
And if you choose to use the WordPress block (Gutenberg) editor, here’s also a detailed guide on how to use that.
Create a Content Strategy
Once your first post is published, the next step is to create an effective content strategy that will help you to stand tall in the industry.
Apparently, blogging isn’t for everyone – and with thousands of new blogs coming to the Internet every day, you must work incredibly hard to get your content noticed. Just like any other business, the key here is a carefully mapped out strategy.
You just need a long-term, proven strategy in place – and once everything is strategized, you’ll certainly reap the rewards.
A recent study showed that “with the right strategy, content marketing can get 3X the number of leads paid advertising can get.”
It is, therefore, important to have a value-based and unified content strategy to boost and maintain your traffic and subscriber base.
So how do you chalk out a proper content strategy?
To start with, here are a few things you should consider while mapping out effective content strategy, according to Content Marketing Institute:

That said, here are some of the areas you should look at while creating your content strategy:
1. Know Your Target Audience
We’ve talked about this earlier, but it’s worth shading more lights on. This is because identifying your target audience is an important step in the process.
Your market/audience should be segmented based on behavior, psychographics, demographics, and geography.
For example, if selling something on your blog is part of your monetization strategy. By segmenting your audience, you will be able to differentiate between visitors who are buyers and those who just want to consume free content and leave.
Check out the graphic below from Neil Patel to see how to segment your audience:

You should already have an idea of the kind of audience that will likely be attracted to your website. But you cannot afford to work with a vague target audience such as a “painter in her early 40s.”
Instead, you need a more detailed analysis to reach a particular segment. Once the segment is identified, you can now perform a market analysis to figure out their needs and wants, as well as how you can solve their problem.
This brings us to the next point.
2. Offer Value and Solve Your Audience’s Problems
The purpose of your blog should be to make a significant impact in the life of the audience. In other words, your primary aim should be to solve a problem giving your audience sleepless nights. Therefore, your website must be a problem solver.
It’s pretty straightforward. The first step is to understand your audience – after which you should create the type of content that will solve their problems.
For instance, if your audience is primarily made up of beginner digital marketers, then you will want to write blog posts on topics that will answer their marketing-related questions.
3. Optimize Your Content Properly
Let’s assume you’re in the food and nutrition industry. You need to figure out what keywords people will most likely use online when searching for food and nutrition-related information.
Improving your SEO by incorporating relevant keywords to your content should be part of your strategy.
For that, you must figure out the type of content web users are searching for online. And then use the same in your blog posts so that they can also compete successfully in the SERPs.
And while at it, you’ll also want to focus more on long-tail keywords, especially when you’re just starting out.
For example, assuming you’re interested in losing weight. You’ll perhaps search for something like “best weight loss diets for women” or something in that nature.
The reason why you should focus more on long-tail keywords is because they’re often not as competitive as their shorter counterparts.
There are many tools out there that will help you find appropriate long-tail keywords such as Ahrefs, SEMRush, and the Google Keyword Planner.
The key is to ensure that the keywords you’re going for are not only in-demand but also very relevant to your niche.
In case you can’t afford premium tools like Ahrefs and SEMRush at the moment, here’s a guide on using Google Keyword Planner for your keyword research.
Start Promoting Your Blog
While content is undoubtedly the bait that will draw your audience, it’s not the only thing you need to succeed. You can write the most seductive and informative copy the world has ever read, but if no one sees it, all your work will be an exercise in futility.
The success of your blog will largely depend on how many people are able to discover and engage with your content – and it all lies in your promotional strategies.
Now, let’s quickly look at some of the best and straightforward promotional tactics you could take to become a successful blogger:
Tell your friends about your new blog
The first step towards promoting your new blog is to tell everyone you know about it. You’ll want to include your website URL in your email signature and social media profiles.
The idea is to seize every opportunity at your disposal to get the word out about your new business. Let me tell you, the first visits you’ll get on your blog will come from your friends and family, and it’s usually fascinating.
This is basically one of the steps you should take immediately your blog is created. Visit some of the popular social media sites on the web (Facebook, Twitter, Pinterest, etc.) and create accounts for your new site.
You will want to start with the ones that are most relevant to your niche and leverage them to help reach your goals. After the accounts are created, invite your friends and family to like and follow your blog.
Then always share your blog posts in the platforms immediately you hit the publish button.
Be active in your industry
Become active in relevant communities in your industry (blogs, forums, social pages, etc.). These communities are a perfect way to reach out and connect with other bloggers in your niche.
Once there, the idea is to engage, build new connections, and help each other to spread your content.
Guest blogging
Guest blogging is one of the best ways to quickly build an online presence – and you should also leverage it to grow your blog.
Since you’ve established some kind of connections with other bloggers in your niche, you can now utilize the relationship more and offer to write a guest post for their sites. Just make sure that you target reputable websites and that the guest post is highly relevant to your niche.
Comment on other blogs
Blog commenting is one of the oldest means of promoting a blog and connecting with other bloggers. While it’s no longer as effective as it used to be, it still works when done well.
Essentially, blog commenting will help you get noticed by the influencers in your industry and their readers. It’ll also help you build your personal brand within the topic. But you want to always ensure that you read the blog post before commenting.
And while commenting, don’t just say, “wow! Nice post, thanks for sharing.” Instead, you want to make it informative and highly relevant to the post you read, as this is the only way you can get the attention you crave for.
Build a mailing list
Immediately your blog starts gaining new readers; it’s highly advisable to start collecting their email addresses so you can always notify them of new articles and offers.
This will also enable you to build some trust with your readers, which will consequently make them to always respond better to your promotional efforts.
Make Money Blogging in 2024
So your blog is now up and running, and you’ve learned of the various ways you can drive traffic to it. Now is the time to make money, which is what you’ve always wanted.
In this section, we’re going to talk about some of the best ways to monetize your wonderful blog.
Affiliate Marketing
This is undeniably one of the best ways to make money with your blog. Essentially, once you’re able to build an audience that trusts you, you can always offer them high-quality products or services that will genuinely help them, and they’ll happily give you their money.
Here, I’m not talking about promoting your own products yet, but promoting affiliate offers from reliable companies that offer money-back guarantees.
Here’s how affiliate marketing works:
- You introduce your audience to a good product/service from a reputable source
- Your audience checks out the offer, figure out that it will help them, and they buy it
- You earn a percentage of the sales (commission)
With affiliate marketing, you’ll benefit in several ways. For example, you help your readers sold their problems while earning money doing so. And most importantly, you get to understand what types of products your readers like buying.
Once you’ve been equipped with this info, you can now develop your own products, services, and courses around it. And this time, you won’t be worrying whether there’s an audience for your offers as you’ve already figured it out.
Sell your own products and services
This is another sweet way to make money from your blog. By now, you’ve already known the type of products and services that your audience likes to buy.
The next thing is now to create such products that will truly help them. It could be an eBook, a coaching program, a paid email subscription, software products, or even physical products. The idea is to create something that will solve their problem based on the kind of affiliate offers they’re already buying.
Furthermore, you can also offer them a service based on your expertise. For example, if you are an expert on services like SEO or social media marketing, you can offer to do it for your readers, and they will happily pay you for it.
Make money with display advertising
This is actually the simplest way to make money online as a new blogger, as it requires little to no effort from your part.
All you have to do is add a simple script to your site, and the ads will start showing at the designated places.
Interestingly, there are many display ads networks on the internet, including Google AdSense, Ezoic, Mediavine, Monumetric, etc.
However, the only drawback of this method is that you’ll need a whole bunch of traffic to make good money from it.
Sell advertising space
Yes, you can easily put some display ads on your site and make a few bucks; however, the real money comes from private advertisers.
Basically, once your blog starts to get massive traffic, you can earn an insane amount of money selling ad spots on your blog to large companies. All it will take you is to add their banner somewhere on your site and continue doing what you do best – write more content.
Frequently Asked Questions
How do I build a personal blog?
If you only need a personal blog that you don’t intend to make a living with, then I’d advise you to with free blogging platforms or simply use Medium.com.
Medium is free, easy to use, is well organized, and will allow you to share your stories and experiences on the internet easily.
Is WordPress Free?
There are two types of WordPress. WordPress.com is free, while the self-hosted version (WordPress.org) is technically free as well; however, you will be required to get your own domain and web hosting since it’s self-hosted.
What is the cost of starting a Blog?
It’ll cost you just $2.95 per month from Bluehost to start a blog. I’d recommend you go with their yearly plan (preferably 3-years) to enjoy the best discount.
Browse More:
- Hostinger Coupon Code India 2024: How to Get Upto 90% Discount?
- How to Check Website Status to Know if its Up and Running?
- How to Get First Month Free Hosting without Credit Card?
- How To Check Domain History with Free Domain History Checkers Tools?
- HostGator vs Hostinger: Which One is Better Hosting for 2024?
- Bluehost India Review 2024: Popular Web Host But Good for India?
Conclusion
It’s effortless to start a blog, but starting one that will be successful is hard. It’ll take lots of hard work, dedication, and consistency. But the rewards are always greater than the risks.
The good thing is that starting a blog is very affordable and won’t cost you an arm and a leg. Yes, there will be obstacles and challenges that will try to throw you off balance. But I urge you to proceed with your passion and surmount all the hurdles. Sooner or later, you’ll leap the rewards a million folds.
Hopefully, you now have all the information you need on how to start a successful blog in 2024. Now, stop reading and take action. Buy your domain name and hosting from Bluehost, and don’t forget to always come back to us whenever you encounter any difficulty.
![How to Start a WordPress Blog on Bluehost [Under 20 Minutes]: Using Bluehost for Blogging](https://hostingmonks.com/wp-content/uploads/2020/02/how-to-start-a-wordpress-blog-on-bluehost.jpg)
![Hostinger Coupon Code 2023 India: How to Get Upto 90% Discount [10% Extra Off on Web Hosting]](https://hostingmonks.com/wp-content/uploads/2021/06/hostinger-coupon-code-india.jpg)