There were so many questions and requests we received in our mail about writing an article on How To Install WordPress on Hostinger. So, in this article, we are going to tell you how you can install WordPress CMS on your hosting account [that you have with Hostinger].
We suggest you go through the complete guide and follow the steps carefully. We will try to make this guide easy, simple, and informative so that you can easily understand it and find this helpful for you.
As you know, there are so many web hosting providers, both cheap and costly, that provide you WordPress CMS with their hosting plans. But as a beginner, we understand that is it not easy to get started with the installation piece. Although you have a customer service team to assist you with it, still, learning new things is always helpful.
So, in this article, we are going to tell you the step-by-step WordPress installation guidelines on your Hostinger account using Auto-Installer. Let’s start by not wasting any second of time.
Table of Contents
Install WordPress On Hostinger Using Auto-Installer

Installing WordPress on Hostinger is so easy and simple that you can do it with a few clicks by yourself.
So, to configure WP on Hostinger, the very first thing that you have to do is get a Hostinger account by purchasing their hosting [in case you don’t have one already]
Excite? Let’s start this guide and hop on to the next steps.
Step 1. Go To Hostinger
As you know, to install WordPress you will need a Hostinger account. So, open your browser and visit Hostinger.in.

Step 2. Choose The Best Web Hosting For Your Website
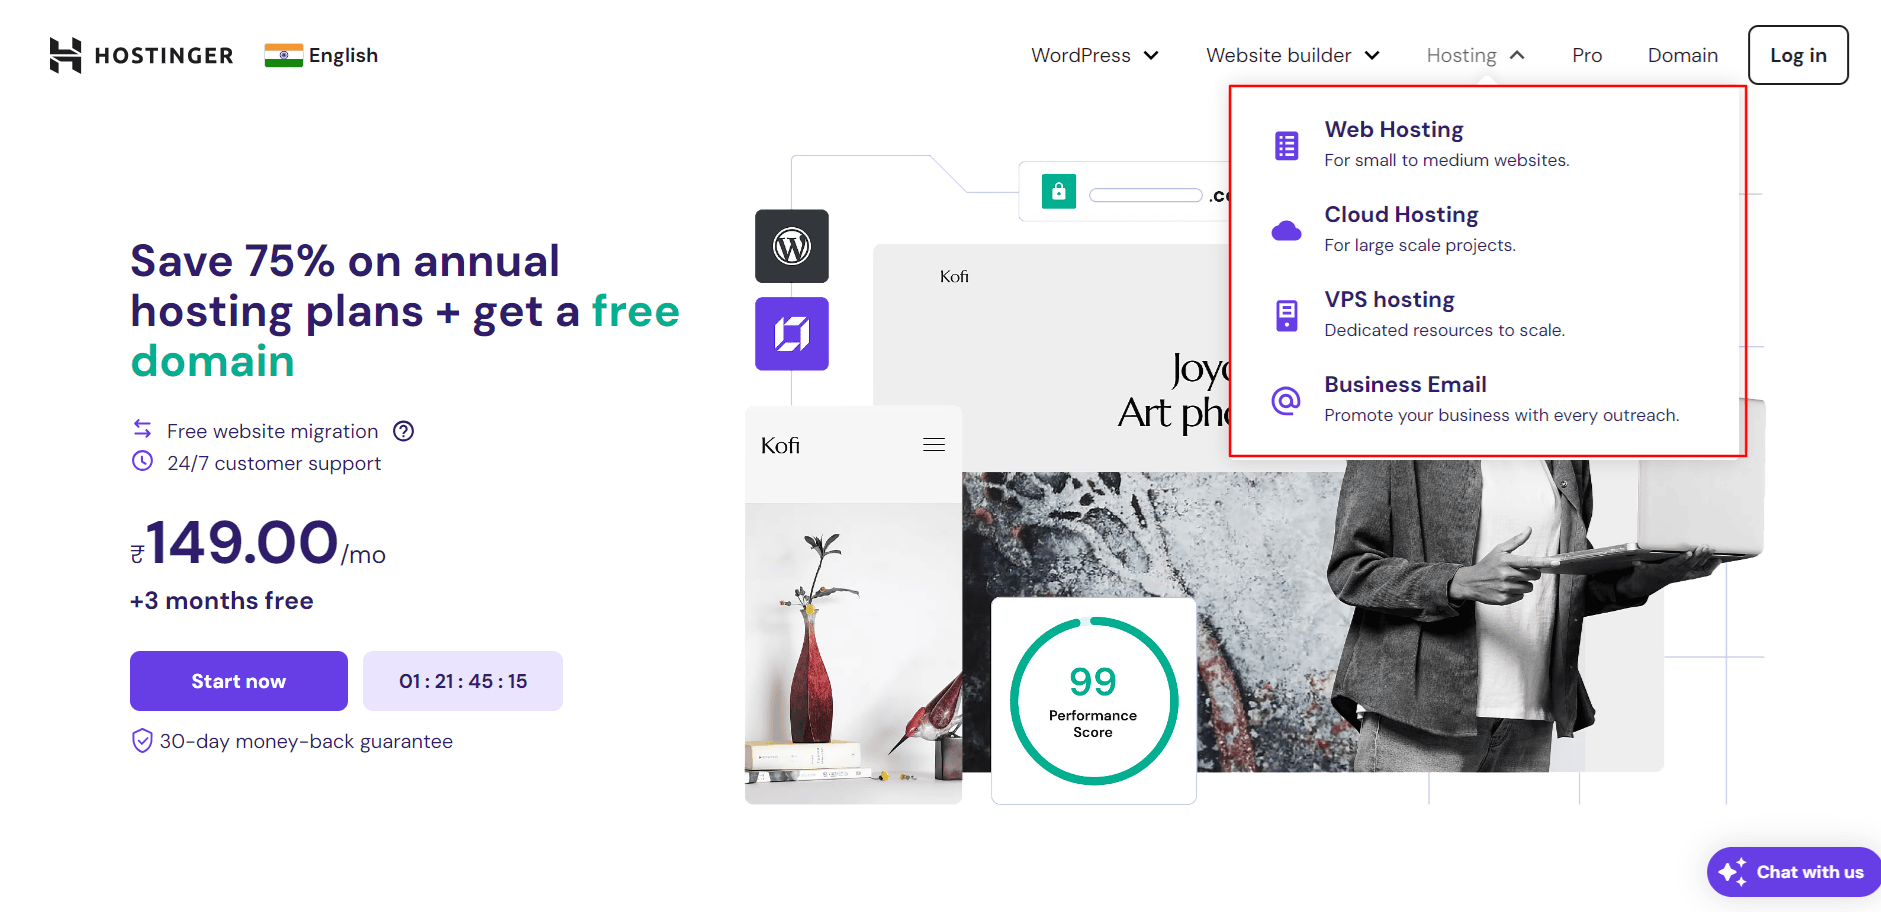
Now, move your cursor to the menu bar and point over Hosting, you will see all available web hosting options to choose from. You can install WordPress on Shared Hosting, Cloud Hosting, VPS Hosting, and cPanel Hosting.
Choose the best web hosting for you, and click on it. In this guide, we are choosing shared web hosting to give you an example.
Step 3. Get One Suitable Plan And Add To Cart
Once you have decided on the suitable web hosting for you, now you have to choose a suitable plan for you. As you can see in the below image, three different plans are offered by Hostinger under its shared web hosting.
We are choosing a single web hosting plan, you can choose one that suits best for your website. Click on the Add to cart button.

Step 4. Purchase Your Order
Now, there is one more step before installing WordPress on Hostinger. After clicking on the Add To Cart button, you will be redirected to a page as shown below.
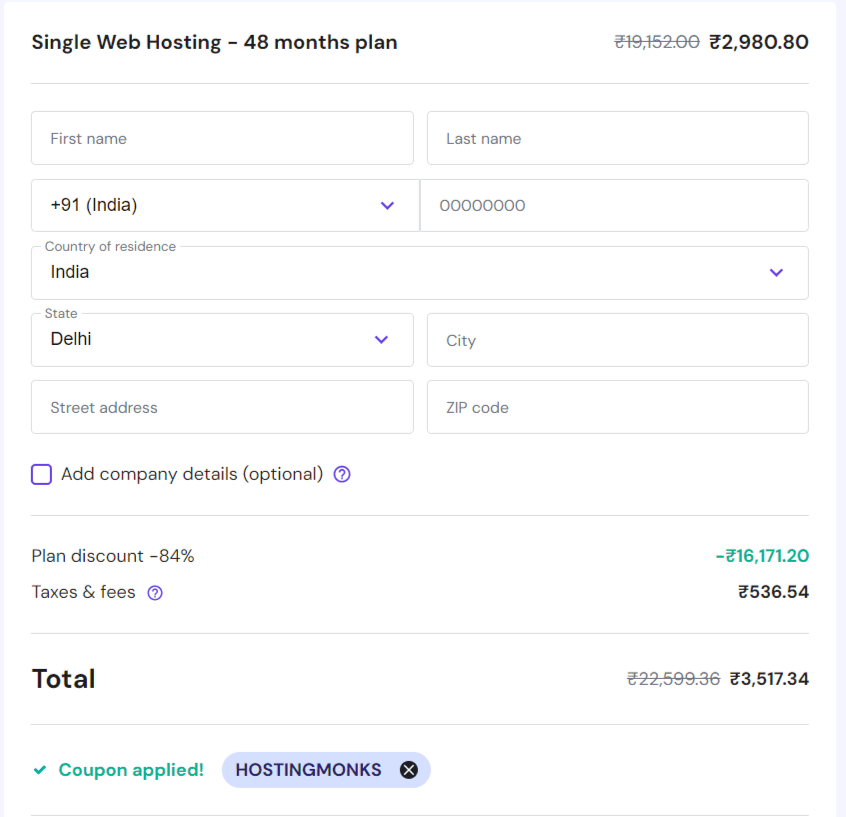
Here, you can choose the period of your hosting plan that you want to purchase (1 month, 12 months, 24 months, 48 months). If you don’t have a domain, you can purchase it from here. With Premium and Business plans, you get Free Domain as well.
Note: Save an Extra 7% OFF by using the ANILAGARWAL coupon code.
Check your order summary, and if everything is good, click on the Checkout Now button and pay for your hosting order.
Step 5. Install WordPress on Hostinger
Once you successfully purchase the web hosting, then you will get an email from Hostinger. In that email, you will get a link for logging in to your hPanel.
Open your hPanel, move to the Hosting section under menubar. Here you will find your Hosting Accounts.
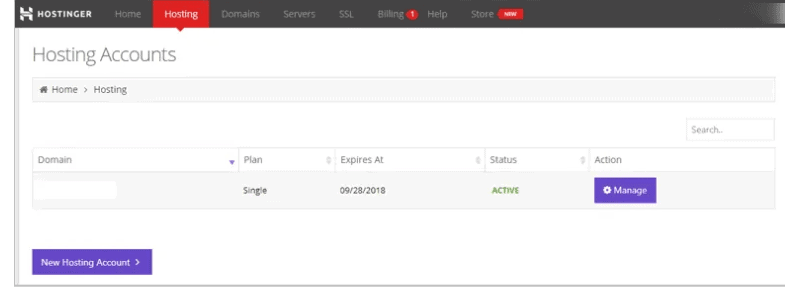
Click on the Manage button, and you will be redirected to the following page where you will find so many different heads and sections to manage your hosting account.
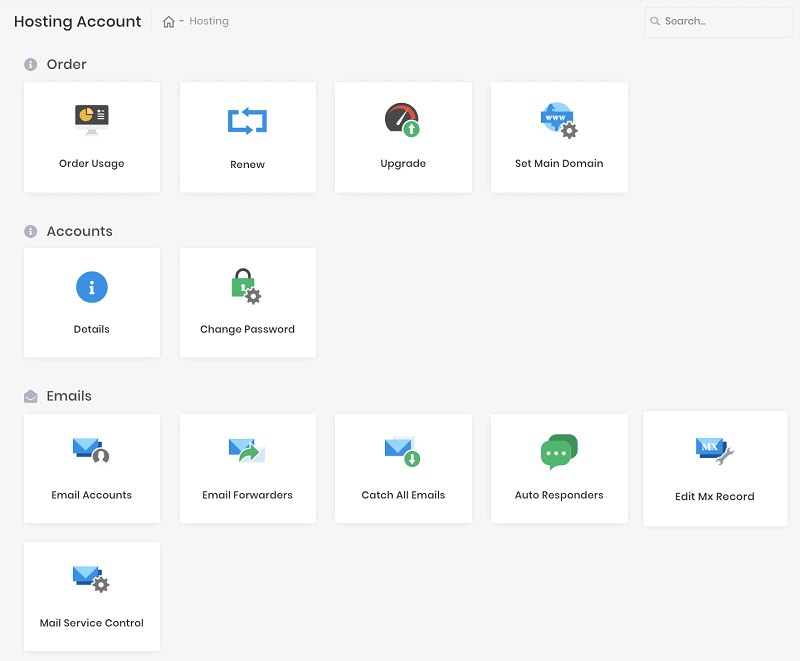
As you can see in the above image, there are various options regarding email management, password management, etc.
But we have to do nothing with all these right now, scroll down this page, search for Website section where you will find an option of Auto Installer.

Yes, Auto-Installer is a tool that will help you to install WordPress on the Hostinger account that you purchased right now. So, click over it.
After clicking on it, you will be redirected to another page, that shows installation options. Here you can easily find WordPress under the “Most Popular” section.
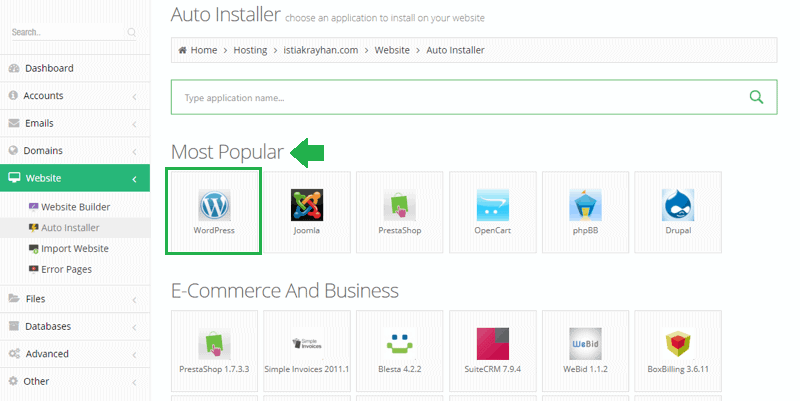
So, this is a very important phase but easy too, click over the WordPress icon to install it on your server.
Now, Hostinger will ask you the domain where you want to install WordPress. So, you have to enter the name of your domain to install WordPress for it.

Click on the Next button and now you have to set the username and password for your WordPress dashboard with your email address so that you can get the details there.
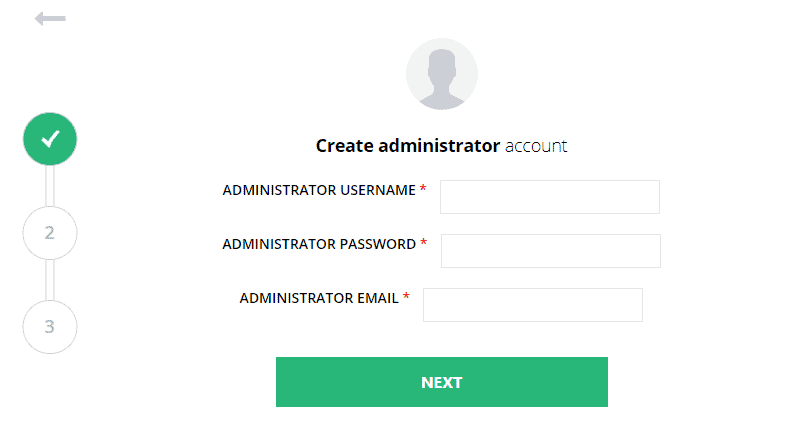
Click on the Next button, and this is it. Now, you will get a login link for your WordPress dashboard in a few minutes on your email. Done!
So, these are the simple steps to install WordPress on Hostinger. If you have faced any issue or trouble while following these steps, then write to us under the comments section below.
Why Hostinger Is Best For WordPress?
As you know, there are a lot of hosting options boasting about their WP platforms online. They all allow you to install WordPress on your server. But Why Hostinger is best for you?
In this section, we are going to tell you the top 5 features for choosing Hostinger for WordPress.
So, here are some of the services and outstanding features that Hostinger provides you for WordPress:
1. Ease Of Use
It is not an issue that you are a professional web developer or a beginner, Hostinger offers you the best and easy-to-use WordPress services. They are made for beginners.
For example we discussed the “Auto Installer” feature above, you can install over 400 such apps with just one click.
They have developed their own user-friendly hPanel, which is very helpful to easily manage and handle your web hosting.
2. Security & Safety
Hostinger takes care of your privacy and data. It provides you the best safety and security options to secure your data and encrypt it while transferring it on the internet.
Your WordPress site gets speed and safety both using LiteSpeed’s cache engine, Cloudflare’s protection, and SSL certificate.
So, when it comes to security, Hostinger is the best web host for your WordPress website. From DDOS attacks to simple data encryption through SSL, everything is FREE and built-in.
3. Themes and Plugins
Moving on to the Themes and Plugins, so for your knowledge, Hostinger provides you a bundle of customizable WordPress themes to create a professional website. A Website builder is also available that helps you make a website with few drag and drop.
Make your website more professional and functional by adding special and required plugins.
They never restrict you from using any theme or plugin of your choice.
4. 99.9% Uptime Guarantee
Hostinger offers you an uptime guarantee of 99.99%, which means most of the time, the site is accessible to your visitors.
However we did some tests during our Hostinger Review, and we found better uptime touching almost 99.99%. If your site is your business, this is one of the best feature that you will enjoy.
5. 24/7 Customer Support
The fifth and very important thing is Customer Support. Yes, Customer Support is very important for hosting users.
If you have a support team that is always ready to help you, then you can fix any issues easily regarding your website and hosting.
That’s what Hostinger offers you, 24/7 customer support that connects and responds to you in under 60 seconds.
Important Link: Hostinger Coupon Code 2025 India
FAQs About WordPress Installation On Hostinger
Here are the steps to connect WordPress to Hostinger:
Step 1. Visit Hostinger.in
Step 2. Choose a web hosting and select a plan.
Step 3. Login to your hPanel account.
Step 4. Search for Auto-Installer.
Step 5. Find out WordPress there and Install it.
Yes, WordPress is completely free with Hostinger. You only have to pay for your Web hosting, and WordPress is made available to you without any charge. So, go to Hostinger and start creating your website now.
Hostinger is a Lituania-based web hosting company whose main objective is to provide the best services at affordable prices. It is cheap because it does not provide unwanted sources and features, instead, it provides only the required resources for a particular plan, which makes it cost-effective and affordable for you.
Web Hosting (Shared hosting) is simple hosting where you are provided with a single server that can be used and shared by multiple users.
WordPress Hosting is a special web hosting service that is highly optimized for WordPress websites.
Here also you are provided with a single server that can be used and shared by other users.
But the best thing about WordPress hosting is that it only supports WordPress, which means no other CMS and OS can be installed on its server, which gives you faster speed, high performance, and good uptime
Browse More:
- How to Check Website Status to Know if its Up and Running?
- How to Get First Month Free Hosting without Credit Card?
- How To Check Domain History with Free Domain History Checkers Tools?
- Bluehost India Review 2025: Popular Web Host But Good for India?
Conclusion: How To Install WordPress On Hostinger?
Installing WordPress on Hostinger is very easy and simple and we hope you find this guide informative and helpful.
There is one more question: Why is WordPress recommended? So, we must tell you that around 41% of websites on the internet are based on WordPress. By this, you can measure how easy and flexible WordPress is. Its ease of use, simplicity, and beginner friendliness makes it one of the fastest-growing CMS in the world.
In this guide, we discussed everything related to Hostinger’s WordPress platform from installation to importance.
If you have any doubts and queries regarding this article, then let us know with your comments under the comments section below.

![Hostinger Coupon Code 2025 India: How to Get Upto 90% Discount [10% Extra Off on Web Hosting]](https://hostingmonks.com/wp-content/uploads/2021/06/hostinger-coupon-code-india.jpg)


