Bluehost India Review INR 169

Product Name: Bluehost
Review Summary
Bluehost India offers affordable hosting products starting at just ₹169 with a Free Domain. You will get excellent customer service and a risk-free 30-day money-back guarantee. Bluehost is an excellent hosting provider that delivers incredible speed and uptime.
Bluehost has launched its Indian arm and I will cover everything about it in my Bluehost India Review.
In this review, we are going to talk about:
- Bluehost India,
- Its pros and cons,
- Bluehost India Plans ,
- Bluehost Performance & Speed,
- Bluehost Alternatives,
- Bluehost India Customer Care
- And Many Other Things
If you are from India and looking for a reliable host that is affordable and comes with a lot of local payment options, this article is for you.
Table of Contents
- Bluehost India Review 2025 – A Quick Summarized Version with Pros & Cons
- What is Bluehost India – Overview
- The Biggest Features to Pick BlueHost India in 2025
- Bluehost India Data Centers & CDN Review
- Bluehost India Speed and Uptime Test
- Bluehost India User Interface Review
- Bluehost India Security & Backup Review
- Bluehost India Real Customer Reviews & Rating
- Bluehost Hosting Plans & Pricing in India 2025
- Bluehost India’s Customer Support
- How to Start a Blog with Bluehost India in 2025
- Alternatives to Bluehost India
- FAQs About Bluehost India
- Conclusion: Bluehost Review India
Bluehost India Review 2025 – A Quick Summarized Version with Pros & Cons

Quick Note: I have compiled a “Bluehost India Review 2025 Table” for your convenience.
You will find my thoughts on Bluehost summarized in an easy-to-read format. The table has updated the latest pricing, discounts, coupons, and other crucial information.
I hope this saves you some time and provides the information you need to make an informed decision about Bluehost.
Bluehost India Review 2025:
| Pointers | Bluehost India Review |
|---|---|
| Pricing of Bluehost India | Starting from just ₹169/month. |
| Free Perks | 30 days free hosting, Free Domain name, and Free SSL. |
| Hosting Types | Bluehost India provides different web hosting plans like Shared, VPS, Dedicated, and WordPress. So whether you need basic shared hosting or powerful dedicated server-based hosting, Bluehost won’t disappoint you. |
| Performance & Uptime | Bluehost India’s Performance is top-notch. Based on our test, here we found: Average 30 days uptime: 99.98% Average Server Response Time: 16ms (GTMetrix) Average Website Loading Speed: 427 ms (Pingdom) |
| Refund Policy | The 30-day money-back guarantee is risk-free. |
| Security | Bluehost India is secure. I have found almost all essential security-related features here. 2 million customers are proof of Bluehost’s reliability. |
| Backup | Daily automated backups through third-party tools ensure website speed won’t be affected at any cost. |
| Customer Care | I have received a response from the Bluehost India customer support agent in less than 1 minute. No problems here. |
| Migration Facility | Simple & free through WordPress plugin |
| Data Centers & Server Locations | India-based data centers are available. The major benefit of Bluehost India for Indian website traffic. |
| Bandwidth and Storage | Unmetered |
| Payment Options | Apart from the standard payment option, Bluehost Supports UPI, Which is perfect for Indian users. Competitors like GoDaddy & Hostinger lack here. |
| Bluehost Pros: Why Should you choose Bluehost India | A few reasons why you should choose Bluehost India:30 Days Money Back Guarantee are affordable hosting plans, India located Data center, Beginners Friendly, and Speedy customer support. |
| Bluehost Cons: Things Which Bluehost India has to Improve | Bluehost doesn’t support Windows servers. Migration of more than 1 site involves charges. |
| Bluehost India Review Verdict: Should We Recommend Bluehost? | Yes, we recommend Bluehost India. The thing that I like most about Bluehost is that they have a very user-friendly interface. You can easily install WordPress on your website without any problems. Another thing that I like about Bluehost is that it’s one of the cheapest hosting companies out there, so it’s great if you’re on a tight budget. Plus, these guys are offering a 30-day free trial on web hosting. So no risk at all. Finally, their robust backup system (through code guard) excites us the most. Most web hosts use their server resources to perform backups, which badly impacts the loading speed. However, with Bluehost India, this won’t be a concern. Overall, Bluehost is a good choice for anyone looking for an affordable web host! |
What is Bluehost India – Overview

Bluehost India has been a leading hosting company in the world since 2003 and is on the list of the 20 largest web hosting companies.
Bluehost is one of the best choices for WordPress blogs and is recommended by WordPress itself.
It is one of the few brands that always provides their clients with best-in-class 24×7 customer support.
Bluehost.in vs Bluehost.com
There are a few key differences between Bluehost.in and Bluehost.com.
- First, Bluehost.in is geared towards customers in India, while Bluehost.com is geared towards customers in the United States. In other words, if your audience mainly belongs to India, Bluehost India would give your visitors a better loading time and response time.
- Second, Bluehost.in offers a slightly cheaper price point than Bluehost.com.
- Finally, Bluehost.in provides 24/7 customer support in Hindi and other local languages, while Bluehost.com only provides 24/7 customer support in English.
The Biggest Features to Pick BlueHost India in 2025
1. Easy to Start and Affordable:
Bluehost India offers a user-friendly platform that makes it easy to start your online journey. The hosting plans are not only accessible but also budget-friendly, providing cost-effective options for individuals and businesses.
Bluehost web hosting plans start at just Rs. 169/month.
You can choose the hosting type that aligns with your specific requirements from various options such as Shared, Cloud, VPS, and Managed WordPress hosting plans.
2. Free Website Migration & Free Domain:
You can use the Bluehost free migration service to move your sites from other hosting to Bluehost.
I have tested the Bluehost migration service which was extremely easy.
You can migrate 1 website to Bluehost free of cost. All can be done with the help of the Bluehost free migration plugin – No technical hassle involved.
If you have more websites, you must pay a fee of Rs 799 to migrate up to 5 additional websites.
I believe offering only one free migration might be somewhat restrictive. Bluehost should increase free migrations by up to five, especially for their premium hosting plans.
Here is the step-by-step video to Migrate to Bluehost.
You can also register a free domain for 1 year with Bluehost Hosting. This can help you save about Rs 799 and also avoid the hassles of DNS configuration.
3. Plenty of Security Measures
I’ve noticed that nearly all the security measures within Bluehost operate on an automated basis. As beginners, you don’t need to concern yourself with intricate configurations. The automated nature of these security features simplifies the user experience, providing a hassle-free and secure environment.
Main security features include;
- Resource Protection
- CodeGuard Automated Backups
- Website Firewall
- 24*7 Malware Scanning
- 24*7 Network Monitoring
- Domain Privacy
- Spam Protection
- Hotlink Protection
- SiteLock
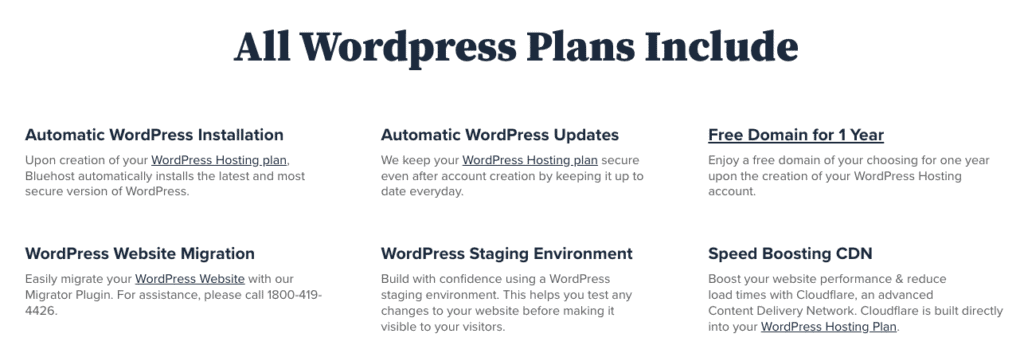
Bluehost also provides free Content Delivery Network (CDN) and SSL certificates that enhance the performance and security of your website. The CDN improves page load times, while the SSL certificate encrypts data, instilling trust among visitors.
4. 1-Click Installation
Bluehost simplifies setting up websites with its convenient 1-click installation feature. You can instiall popular content management systems like WordPress and applications effortlessly, saving time and effort.

5. Scalable Hosting Plans
Bluehost India allows you to upgrade your hosting plan at any point for seamless expansion. You can easily upgrade their hosting resources to accommodate increased traffic and demand, ensuring optimal performance at all stages of their online journey.
Bluehost India Data Centers & CDN Review
Bluehost India offers two data centers, USA and India.
If your audience is located in India, hosting a website with Bluehost India will give them an extra speed boost. High website loading speed leads to high core web vitals score – Meaning Top Rankings in SERP.

Even if your audience is located in other countries, they won’t experience below-average page load speeds.
Bluehost also incorporates an integrated Cloudflare CDN, guaranteeing optimal performance irrespective of your readers’ locations.
Bluehost India Speed and Uptime Test
I used several renowned tools like Pingdom and GTMetrix to run the speed and uptime test of the Bluehost India hosting.
I set up a test website on Bluehost to conduct the test.
Bluehost’s Page Load Speed Test
I tested a live site hosted on Bluehost using Pingdom.
Pingdom is one of the best tools to test the speed of your website from multiple server locations and gives you an accurate result.
When I tested our site from Washington’s server locations, 1.3MB, the full page was loaded in just 427ms (response time), which is very fast.
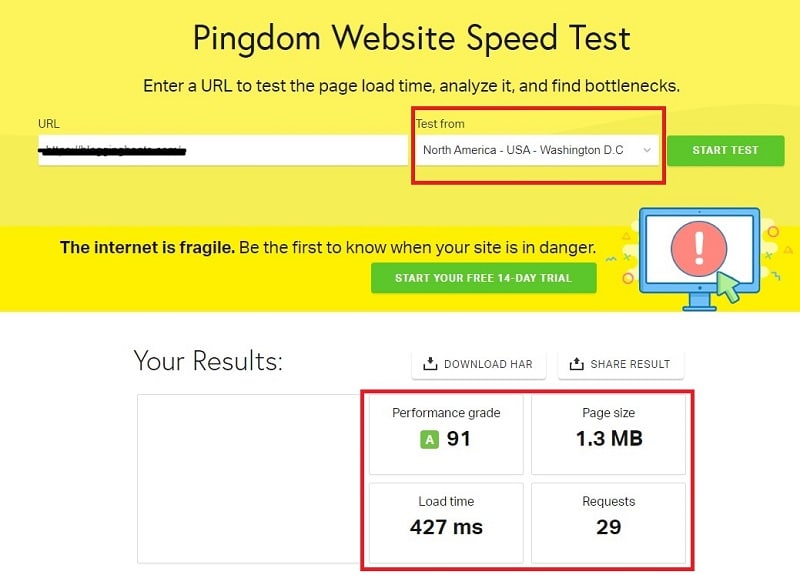
Quick Note: I tested the page speed without using any caching plugins on our Bluehost India-hosted website. Bluehost performed exceptionally well without caching plugins. The results will be better if we plug in caching plugins like WP Rocket or W3 Total Cache on our WordPress site.
I also tested the same site using GTMetrix from Canada, and the result was an A Grade. The performance was 94%, LCP 1.1s, which is amazing.

Bluehost’s Uptime Test
Bluehost guarantees 99.99% uptime.
I ran an uptime test on multiple tools to verify the Bluehost claim.
Uptime Test Result on UptimeRobot Tool
I have set the uptime tracking for my blog hosted on Bluehost with the help of the UptimeRobot tool.
I got 100% uptime results for the website hosted on the Bluehost server.

Bluehost Uptime Test By by HRANK
I also used the real uptime tracker by HRANK to reverify the Bluehost uptime.
On HRANK, I got a 99.978% uptime result for Bluehost, almost 99.9% as claimed by Bluehost.

Bluehost Uptime on Pingdom
I used Pingdom and checked the HTTP resolution every minute. As you can see in the snapshot below, the latest uptime report of last month shows 99.98% Uptime.
As per the industry, this is one of the best performances you can expect practically.

After performing these speed and uptime tests of Bluehost, I can say that it is one of India’s best web hosting providers in terms of Speed and Uptime.
Bluehost India User Interface Review
Bluehost user interface is divided into 2 sections: Basic and advanced (cPanel)
You can access the marketplace, Email, office, and domains in the basic dashboard. This is the dashboard designed especially for beginners who don’t want to mess with cPanel and advanced hosting configuration.
An overview of the number of sites, updates, plugins installed, and other basic information can be accessed from here.

You can access the cPanel by tapping the advanced button:

Bluehost cPanel is a powerful web hosting control panel that allows you to manage your website and server from one place. It has several features, such as:
Security – Bluehost’s security layer protects you from hackers, viruses, malware, and other threats.
Ease of Use – With Bluehost’s cPanel, you can add new websites in minutes.
Features – The cPanel has many features, such as FTP access, MySQL database management, email accounts, domain names, and more.
Bluehost India Security & Backup Review
Bluehost uses a robust security protocol called SSL (Secure Sockets Layer). This protocol encrypts all data transmitted between your browser and Bluehost servers. Consequently, even if someone intercepts your data, they would be unable to decipher its contents.
In addition to SSL, Bluehost also uses a number of other security measures to keep your data safe. For example, they have a strict policy of not sharing your personal information with any third party. They also have firewalls in place to protect their servers from hackers.
Other security features include:
- Single Sign-on Feature (SSO)
- 2FA
- IP Addresses removal
- Regular Automated Malware Scanning using SiteLock
- Domain Privacy
- Spam Protection
- DDos Protection
Overall, Bluehost is a very secure web hosting provider. They have multiple layers of security to protect your data and a good track record of keeping their customers’ data safe.
Bluehost India Backup:
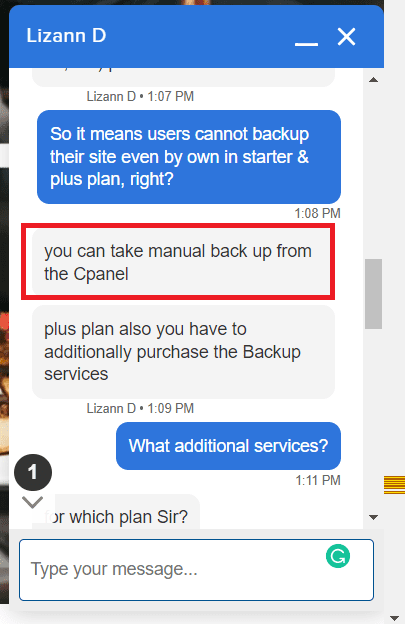
Bluehost India has integrated with Codeguard for daily backup functionality. However, the daily automated backup benefit is only available in Choice Plus, Online store & Pro Plans.
Quick Note: Thanks to Codeguard integration, backups will be conducted externally and doesn’t impact the website’s loading speed.
For basic plans, you have to create your backup from the cPanel – I have verified this from Bluehost India Customer Support.
With a straightforward process, you can easily restore or delete backups through the CodeGuard platform.
You can watch the following video from Bluehost to learn the step-by-step backup restoration and deletion process.
Bluehost India Real Customer Reviews & Rating
I have analyzed the real customer reviews across many product review platforms.
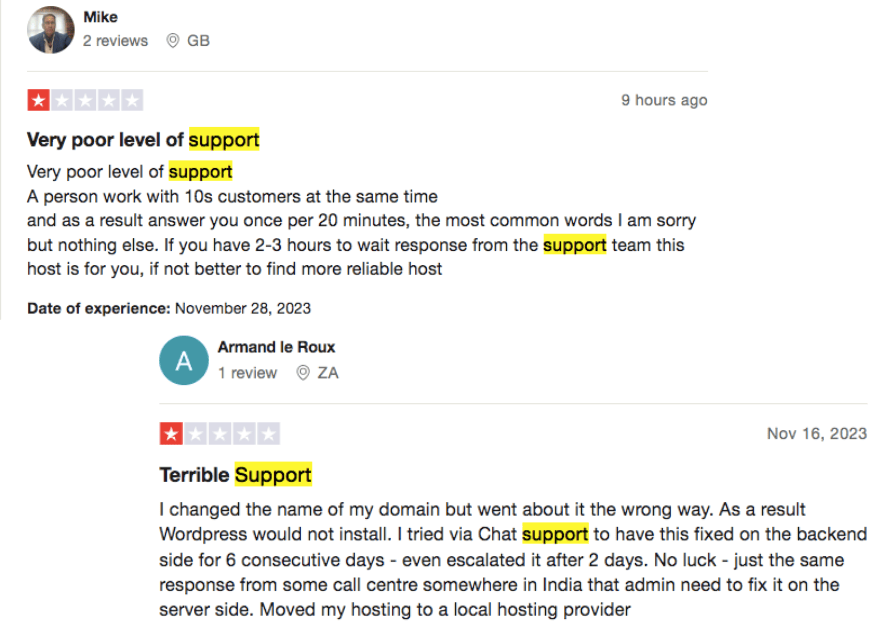
Bluehost has garnered diverse reviews from customers across various online platforms. While one segment expresses satisfaction with the service, another segment rates it poorly.
Here are some Bluehost reviews from real customers on major review platforms:
Bluehost customer rating on Trustpilot
Bluehost receives a rating of 4.1 out of 5 on Trustpilot from about 14900 customers. Approximately 66% of users give it a 5-star rating, while 26% rate it poorly with 1 star.

Bluehost customer rating on Capterra:
On Capterra, Bluehost earns an excellent rating of 4.1 out of 5 stars.

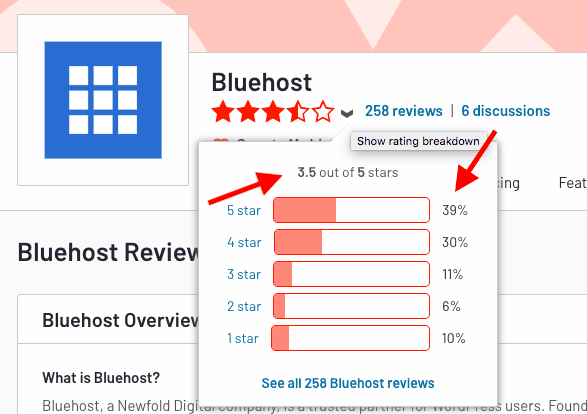
Bluehost customer rating on G2:
Bluehost has an average rating of 3.5 out of 5 from over 250 reviews on G2. The diverse ratings suggest varying customer experiences, with some expressing satisfaction and others encountering issues or concerns.
Here is the summary of the positive and negative feedback on Bluehost India from the customers.
Positive Points:
- Users are highly impressed with Bluehost’s performance and security at affordable pricing.
- All users report operating Bluehost’s cPanel and completing the onboarding process seamlessly.
- Bluehost’s customer support receives praise, with users noting quick responses even during late hours.
Negative Points:
- Some users express confusion about which features or add-ons to install due to the abundance of tools in Bluehost’s marketplace, and the additional charges can discourage users from making purchases.
- Many users voice concerns about higher renewal charges.
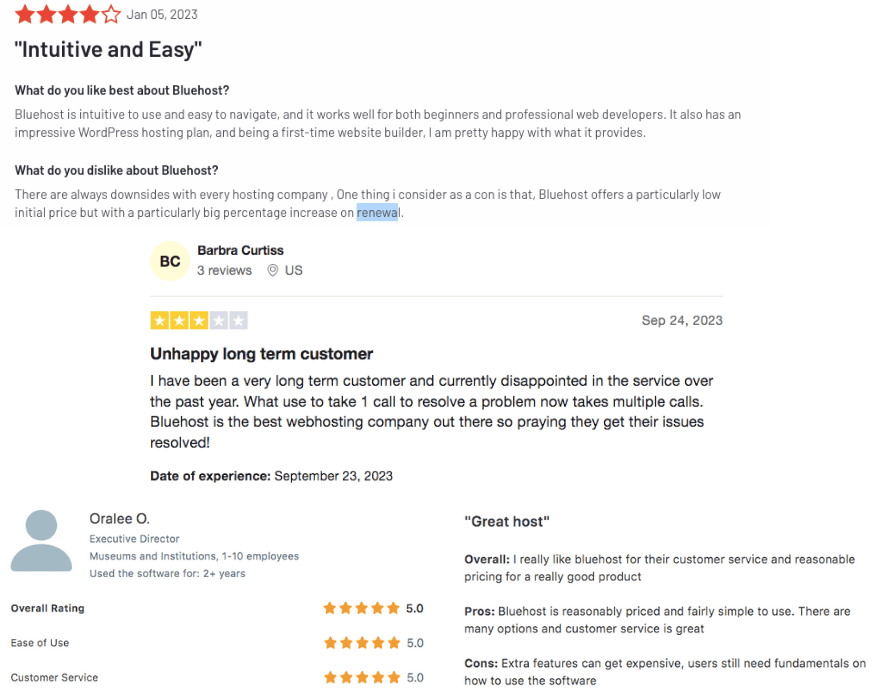
This diverse feedback highlights customers’ varying experiences with Bluehost India, emphasizing both positive aspects and areas for improvement.
Bluehost Hosting Plans & Pricing in India 2025
Bluehost India offers web hosting plans for all user needs, starting from Shared, VPS, Dedicated, Woocommerce, and WordPress hosting.
Here is the overview of Bluehost India pricing:
| Bluehost Hosting Types | Our Verdict | Pricing & Plans (India) |
|---|---|---|
| Bluehost Shared Web Hosting | Perfect for beginners. Go for shared web hosting, especially when the budget and web traffic are low. | Starts with ₹169/m. Bluehost India is giving a 30-day trial on shared web hosting. |
| Bluehost WordPress Hosting | Perfect for WordPress starters. Here, WordPress will be installed automatically – The only main difference compared to shared hosting | It starts with ₹169/m |
| Bluehost Managed WordPress Hosting | Perfect for Big websites. The SSD-based server & disk servers are major perks here. The Bluehost team will manage the backend part. | Starts with ₹1,259/m |
| Bluehost VPS Web Hosting | Perfect for those who are not willing to share CPU and RAM with others. Plus, any kind of web application can be installed here by getting root access. | Starts with ₹1,649/m |
| Bluehost Dedicated Server Hosting | The complete server resources will be allocated to one website. So if your website hits enormous monthly traffic and high performance is your goal, Bluehost India dedicated servers should be your first pick. | Starts with ₹8,499/m |
| Bluehost WooCommerce Hosting | Perfect for starters willing to build their online store with a WordPress WooCommerce plugin. The WooCommerce plugin will come pre-installed in Bluehost WooCommerce hosting. | Starts with ₹599/m |
- Read: Bluehost Shared Hosting Plans Review
- Basic Shared Web Hosting
- Choice Plus Shared Web Hosting
- Online Store Shared Web Hosting
- Pro Shared Web Hosting
- Basic Shared Web Hosting
- Plus Shared Web Hosting
- Choice Plus Shared Web Hosting
- Online Store
- Standard VPS Web Hosting
- Enhanced VPS Web Hosting
- Ultimate VPS Web Hosting
- Standard Dedicated Web Hosting
- Enhanced Dedicated Web Hosting
- Premium Dedicated Web Hosting
- Build Managed WordPress hosting
- Grow Managed WordPress hosting
- Scale Managed WordPress hosting
- Knowledge Base: a comprehensive knowledge base with articles and guides covering a wide array of topics. You can use these resources to find solutions to common issues and understand various features.
- Video Tutorials: Bluehost provides video tutorials to help those who prefer visual demonstrations. Bluehost has a dedicated YouTube Channel featuring a comprehensive collection of videos covering nearly every aspect of Bluehost hosting.
- Documentation and Manuals: Detailed documentation and manuals are available for users who prefer in-depth information. These resources can be handy for advanced users or those seeking technical details.
- Read Next: Purchased a domain & hosting – Now what?
- Hostinger Coupon Code India 2025: How to Get Up to 90% Discount?
- Kinsta Hosting Review: How Good Is Their Premium Managed Hosting for WordPress in 2025?
- Best of the Best: Top 7 VPS Hosting India for 2025
- How to Check Website Status to Know if its Up and Running?
- How to Get First Month Free Hosting Without Credit Card?
- How do you check domain history with free domain history checker tools?
1. Bluehost India Shared Web Hosting
In Shared hosting, multiple users or websites use a single server resource. That makes it one of the cost-effective solutions for new or low-traffic sites.
Shared hosting is suitable for beginners or those who own a small business with fewer visitors.
Bluehost India divided its shared hosting offers into four variants:

Let’s compare them in a table together with the price.
| Bluehost India Shared Hosting Plans Features | Basic | Choice Plus | Online Store | Pro |
|---|---|---|---|---|
| Price | ₹169/m | ₹279/m | ₹599/m | ₹799/m |
| Website | 1 | Unlimited | Unlimited | Unlimited |
| SSD storage | 50GB | Unmetered | 100 GB SSD | Unmetered |
| Bandwidth | Unmetered | Unmetered | Unmetered | Unmetered |
| SSL certificate | Free | Free | Free | Free |
| Free Domain | For one year | For one year | For one year | For 1 year |
| Malware Scanning | Yes | Yes | Yes | Yes |
| Cloudflare Free CDN | Yes | Yes | Yes | Yes |
| Yoast SEO Optimizer | No | Yes | Yes | Yes |
| Free Domain Privacy | No | No | Yes | Yes |
| Free Daily Backup (Codeguard) | No | No | Yes | Yes |
All Bluehost shared hosting plans are available with Free Domain, SSL, and no Bandwidth cap. Except for the entry level plan, all plans allow you to host multiple websites.
Bluehost ensures that your sites are scanned for malware daily by “SiteLock.”
All shared hosting plans are scalable, so you can easily switch to higher plans without downtime.
Read: Which Bluehost Shared Hosting Plan Should I Go For?
2. Bluehost India WordPress Shared Hosting
Shared WordPress hosting offers the same features of Bluehost shared hosting along with one-click WordPress installation and managed updates. It’s ideal for those who run WordPress-based sites.
Bluehost India divided its shared hosting offers into four plans:

Let’s just compare them in a table together with the price.
| WordPress Shared Hosting Plans Features | Basic | Plus | Choice Plus | Online Store |
|---|---|---|---|---|
| Price | ₹169/m | ₹279/m | ₹279/m | ₹599/m |
| Website | 1 | Unlimited | Unlimited | Unlimited |
| SSD storage | 50GB | Unmetered | Unmetered | 100 GB |
| Bandwidth | Unmetered | Unmetered | Unmetered | Unmetered |
| SSL certificate | Free | Free | Free | Free |
| Free Domain | Yes | Yes | Yes | Yes |
| Malware Scanning | Yes | Yes | Yes | Yes |
| Cloudflare Free CDN | Yes | Yes | Yes | Yes |
| Yoast SEO Optimizer | No | No | Yes | Yes |
| Free Domain Privacy | No | No | Yes | No |
| Free Daily Backup (Codeguard) | No | No | Yes | Yes |
3. Bluehost India VPS Web Hosting
VPS (Virtual Private Server) provides virtually dedicated servers. You get a virtually split slice of RAM and CPU for better performance.
As the name says, Private, all the resources in the VPS servers are used by you exclusively, and no other user can use your resources.
Bluehost India offers you three categories for VPS Web Hosting:
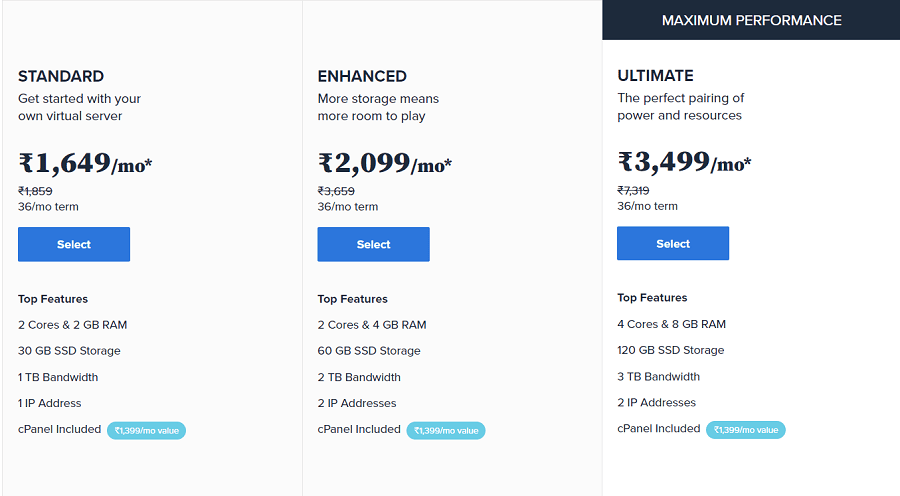
Here is the comparison table for all three VPS plans of Bluehost India:
| Bluehost India VPS Hosting Plans Features | Standard VPS | Enhanced VPS | Ultimate VPS |
|---|---|---|---|
| Cost | ₹1,649/m | ₹2,099/m | ₹3,499/m |
| Cores | 2 | 2 | 4 |
| SSD storage | 30GB | 60GB | 120GB |
| Bandwidth | 1 TB | 2 TB | 3 TB |
| IP address | 1 | 2 | 2 |
| RAM | 2GB | 4GB | 8GB |
4. Bluehost Dedicated Web Hosting
It is web hosting where you buy a dedicated physical server with full root access. A dedicated server ensures high speed, the fastest performance, great security, and premium customer support.
You have your own physical server and don’t have to share RAM, CPU, and Storage with anyone.
Bluehost India offers three Dedicated Server plans:
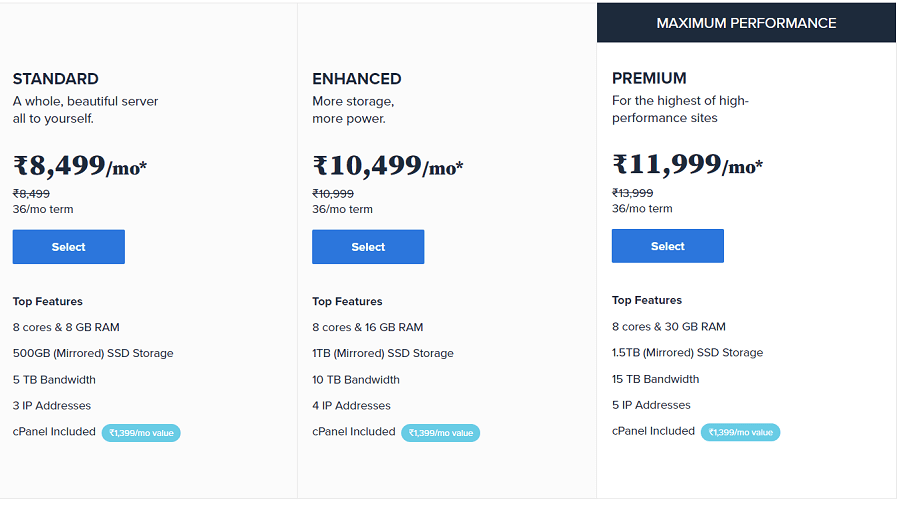
| Bluehost India Dedicated Hosting Plans Features | Standard | Enhanced | Premium |
|---|---|---|---|
| Cost | ₹8,499/m | ₹10,499/m | ₹11,999/m |
| Cores | 8 | 8 | 8 |
| SSD storage | 500GB | 1 TB | 1.5 TB |
| RAM | 8GB | 16GB | 30GB |
| Bandwidth | 5 TB | 10 TB | 15 TB |
| IP address | 3 | 4 | 5 |
Dedicated Hosting is the best solution for heavy-traffic sites. You can handle any type of workload with the help of powerful configurations, which include the power of DDR4 memory, SSD storage, and Xeon D processor.
If you are an advanced user and know how to operate a server, this hosting is highly recommended. Full root access with a choice of Operating system is an added advantage with this hosting type.
5. Bluehost India Managed WordPress Hosting
Bluehost Indian Managed WordPress hosting is a specialized hosting exclusively for WordPress websites. This hosting offers highly optimized and performance-oriented plans, with WordPress backend-related optimization done by Bluehost engineers.
It includes daily scheduled Backups, a marketing center, 100+ WordPress themes and Free malware removal.
Bluehost India divided its Managed WordPress hosting into three different plans:
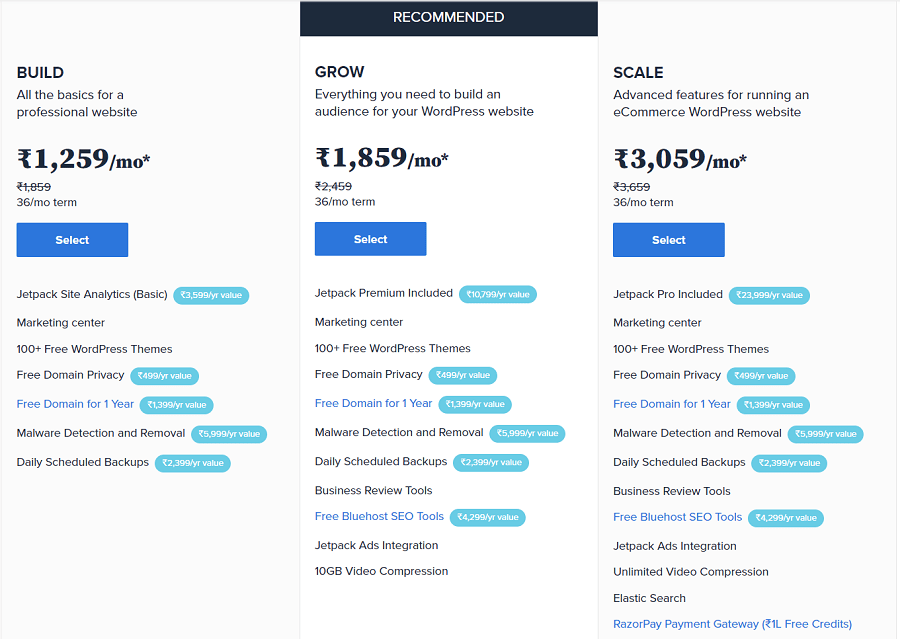
| Managed WordPress Hosting Plans Features | Build | Grow | Scale |
| Cost | ₹1,259/m | ₹1,859/m | ₹3,059/m |
| JetPack | Basic | Premium | Pro |
| SSD storage | Unlimited | Unlimited | Unlimited |
| Domain | Free | Free | Free |
| Free SSL | Enabled | Enabled | Enabled |
| Daily Scheduled Backups | Yes | Yes | Yes |
| Free SEO Tools | No | Yes | Yes |
| Video Compression | No | 10GB | Unlimited |
Related: Shared Hosting vs Managed Hosting [The Quick Comparison]
Bluehost India’s Customer Support
Bluehost offers 24/7 assistance via both chat and phone calls. This distinguishes Bluehost from some competitors, such as Hostinger, which do not provide phone call support.

Quick Note: The Bluehost India Customer Care Number is 1800-419-4426 and +912271221644
Along with the Chat and Phone support, Bluehost provides a range of resources to help you resolve issues:.
By offering a variety of resources, Bluehost aims to empower users to troubleshoot and resolve issues independently, enhancing the overall customer support experience.
Bluehost live chat testing
I have tested Bluehost India Chat support. The response rate is speedy. Their customer support team replied back to us in a few seconds.

I have not encountered any shortcomings in Bluehost’s support services.
Upon analyzing user feedback regarding Bluehost support, I observed mixed customer reviews. Some users provided positive feedback, expressing satisfaction with the support services.

Conversely, a few customers reported having a less favorable experience with the support team.
How to Start a Blog with Bluehost India in 2025
Starting a blog or website with WordPress is as easy as purchasing a product from a shop.
You need to follow these steps to start a blog with Bluehost.
Step 1: Click This Link to Visit the Bluehost India Website.

Step 2: Choose a web hosting and select a particular plan.
Step 3: Next, when you select a plan for yourself, click the “Select” button and go ahead.

Step 4: The next step is to select a domain. If you already have a domain, then you can choose that one, or else you can purchase a new domain.

Step 5: When your searched domain is available, you will see a success message that your domain is available, and then you have to log in or signup.

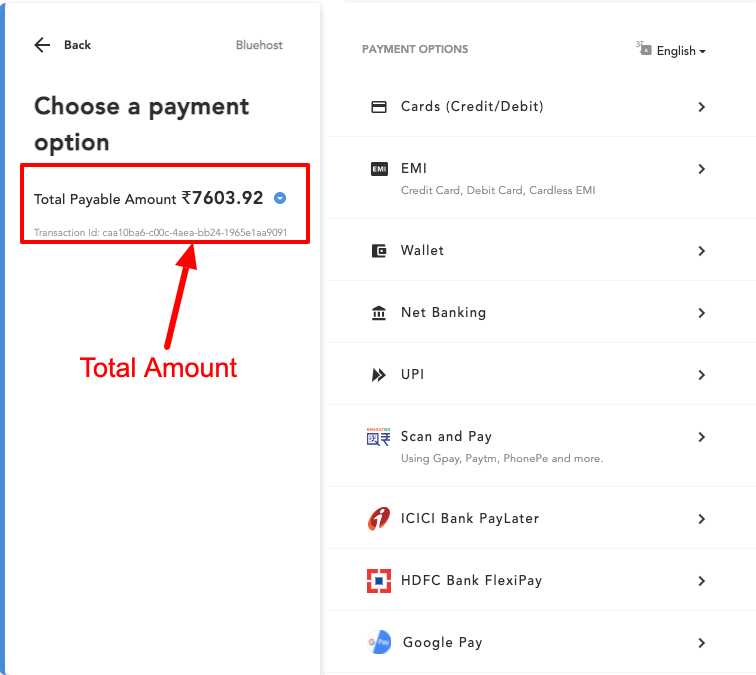
Step 6: After this, you will be asked for the Account Information, or you can say the billing information; you have to fill in all required details.

Step 7: Here is the time to choose the period of the plan. [See image below].

Step 8: Bluehost India offers some add-ons that may help you. You can choose the extras and packages that you want to buy with your hosting.

Step 9: Here, you must agree with the Terms and Conditions of Bluehost India and click the Submit button.

Step 10: Now, you must choose the Payment Method and proceed.
So, this is how you successfully purchased Bluehost India’s web hosting.
Alternatives to Bluehost India
If you are still confused or looking forward to exploring more options, I recommend some of the best alternatives to Bluehost India.
1. Namecheap
Namecheap is a reliable host that starts at just ₹179.41/m only.
Namecheap provides Unlimited bandwidth, a Website Builder, a free domain, SSL installation, 30 30-day Refund Policy, and 24/7 support.
2. Hostinger
Hostinger is a well-known web host offering its web hosting services at just ₹69/month. Learn more in Hostinger Review.
It provides you a Business Email account, a free SSL certificate, managed WordPress and MySQL Databases, 30 days of the money-back guarantee, and 24/7 customer support.
3. Hostgator
Hostgator is the third best alternative to Bluehost, which starts offering its services at just ₹79/month.
Hostgator provides Unmetered Disk Space, Lightening-fast Indian servers, 24*7 Customer Support, Unmetered Bandwidth, Guaranteed 99.9% Uptime, 45 days of a money-back guarantee, provides Free Domain, Unlimited Databases, Free SSL, etc.
FAQs About Bluehost India
Yes, Bluehost has a dedicated data center in Mumbai, India.
Yes, Bluehost India also deals with domains. You can purchase a domain separately or claim it for free by buying any web hosting plan.
Yes, Bluehost is a web hosting company that allows beginners to install WordPress with just one click. All their hosting plans are affordable for new sites, starting at just ₹169. Bluehost provides a free SSL, domain name, and 24/7 customer support.
Bluehost offers the best website security, server speed, and uptime. When I tested our dummy site (hosted on Bluehost), I found significant results on critical parameters like speed and uptime [99.97%]. So yes, Bluehost is the best option for India.
Bluehost has existed since 2003 and caters to over 2 million sites. Excellent customer service record with easy-to-use platforms, knowledgebase, and options for third-party integrations makes it a go-to solution. Its products are made for beginners as well as pro users.
If you don’t like their services and features, you can claim your money-back guarantee within 30 Days.
Based on the Bluehost India reviews available on popular sites, including Trustpilot, G2, etc. It can be concluded that Bluehost is popular on the internet, and many existing users are recommending it.
Choice Plus & pro plans are the best because they include free automated daily backup benefits.
Bluehost India has hundreds of videos + written tutorials on its site. You can access them anytime for free.
Browse More:
Conclusion: Bluehost Review India
Bluehost is suitable for both newbies and pros.
Bluehost needs no other recommendation, as WordPress itself recommends it. Talking about the level of trust, it is used by over 2 million customers worldwide.
If pricing is a consideration, I found it an excellent value for money with all essentials as freebies.
Bluehost is a brand that is recognized for its round-the-clock customer service. You can connect through chat or call.
Ultimately, I hope this Bluehost India review 2025 is a useful guide in choosing the right host for you. If you have any queries or suggestions regarding this article, please ask using the comments section below.

![Bluehost India Coupons July 2025 [83% OFF + Free Domain] – Applicable for All Users](https://hostingmonks.com/wp-content/uploads/2021/03/bluehost-coupon-code-for-india.png)

![Hostinger Coupon Code India July 2025: Get Up to 90% on Domain, Hosting & Renewals [19 Live Offers]](https://hostingmonks.com/wp-content/uploads/2021/06/hostinger-coupon-code-india.jpg)